Frequently Asked Questions (FAQ)
You can find below answers to some of the most common questions we are asked about Builder and its features.
Supported browsers
General
No. A module must be edited by a single editor at the time. The editor must also remember to close the module after s/he has finished editing its content.
Currently, Builder is only available in English. However, we do offer Finnish-language user guides on our Help and FAQ pages to support usage.
If any part of the English interface is unclear, we recommend checking the following support pages:
https://help.apprix.fi/
The course is considered completed only after the Finish element (the last element of the module) has been reached.
No.
Retaking the Course
Even if the learner has previously completed the course, they must start it from the beginning when retaking it.
This means they are required to go through the entire course and complete the same exercises as in the previous attempt.
Completing the Final Test
At the end of the course, the learner must take a final test, if this is included in the training.
If they do not pass the test, they are required to retake it.
There is no limit to the number of attempts — the test can be repeated as many times as needed until it is completed.
The module works in such a way, that when the trainee logs in with certain IDs, the training is started and continues until the trainee has reached the last page (Finish element).
If the trainee interrupts in the middle of the execution of the module, the next time when s/he will log in again the training will continue from the same page where s/he left it.
If in the module contains submodules and a submodule has not been completed, the trainee must start the submodule from the beginning.
If the module has a Pass / Fail element and the trainee does not pass the final test, if the number of tries does not exceed the maximum number allowed, s/he will be automatically redirected to the beginning of the final test (the element “Retry from here” defined in the Pass / Fail settings). Otherwise, s/he has to start the whole training from the beginning (from the Intro-element).

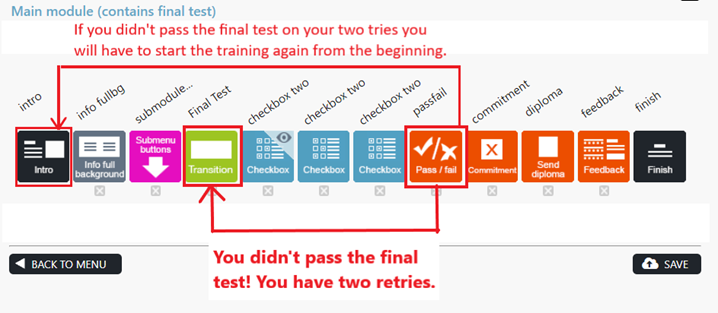
In this case, the user can try the test twice. If s/he does not pass the test twice, s/he has to start the module again from the beginning (Intro element).
The trainee may have activated the Chrome browser settings that allow the Google Translate plug-in to translate text. When this is the case, the browser starts translating pages into the chosen language, e.g. Finnish into Finnish or English into Finnish, even if the original language is Finnish. This results in confusing text.
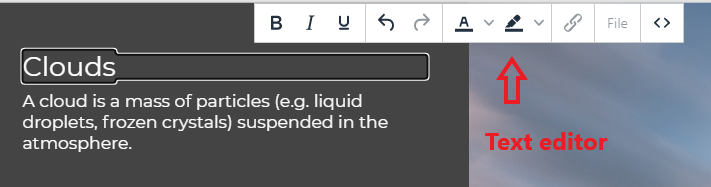
Editing elements’ texts works similarly to most common text editors. Click a text field to edit it and use the text tools to format your text. All changes will be saved immediately.
If in a pop-up window, there is a Save button, the changes will not be saved automatically, but you need to press the Save button if you wish to save your
changes.
The Last Modified yyyy-mm-dd time stamp refers to changes in the module structure but not to the content of the elements. If you add or remove an element or change the order of the elements in the module, the Last Modified date will be updated accordingly.

The pop-up window does not appear because the browser is blocking it. This may be due to the browser’s security settings, or it may be temporarily turned on if the “Do not allow this page to create new windows” option has been selected. This temporarily prevents the pop-up window from being displayed. Reloading the page in Firefox or reopening the browser in Internet Explorer should reset this setting.
You can also try to use another browser if the pop-up window does not appear.
If the pop-up window does not appear when you reopen or change the browser, it is recommended to contact the IT Support of your organization. They may know if the browsers in your organization have security settings that prevent such pop-up windows.
Yes, it is possible. But the facilitator cannot create or edit the content of the E-Learning courses on a mobile phone.
Follow these instructions when you need to give the browser permission to open the E-Learning course in a new tab.
- Choose the E-Learning course you want and click on its language button.
- If the new tab does not open, the message “Firefox prevented this site from opening a pop-up window” will appear at the top of the window.
- Click the notification button and select “Allow pop-ups from apprix.fi“.
- Close the new tab that opens with the error message.
- Click the training language button again and the E-Learning course will open normally.
This may be because Firefox’s incognito/private window has Enhanced Tracking Protection enabled by default. If you open the training in Firefox in an incognito/private window, you should turn off Enhanced Tracking Protection to ensure that the training loads correctly. This is not enabled in the standard Firefox window, so there is no need to change the setting. The setting can be disabled from the menu shown in the image.
![]()
As the controller, the customer always decides how to store the records and instructs Apprix on how to proceed. In the absence of specific instructions, performance data will be kept indefinitely. Apprix can be asked, for example, to automate the anonymisation of performance data (e.g., performance data older than 2 years is anonymised every 3 months) or to delete it manually. However, these are always agreed upon on a customer-by-customer basis. Customers are advised to exercise caution when deleting/anonymising performance data.
The content to be embedded may not be visible because the domain from which the content is embedded is not yet on the Apprix list of allowed domains.
Please provide the Apprix HelpDesk(helpdesk@apprix.fi) with the content URL to be uploaded. Alternatively, you can give the entire embed code, as the URL will be found there naturally. Apprix will add the domain to the list of allowed domains if missing. In addition, the content to be embedded may not be visible to those who have started the training, as the settings of the content to be embedded limit who can see it. Depending on the service you are using to embed the content, the content visibility settings may need to be changed for the content to be visible. The settings may need to specify who can view the content and the addresses to which the content can be embedded. In the case of Builder, add “builder.apprix.fi” as an allowed address if necessary.
If a module/online course is unpublished, Builder will not send reminders.
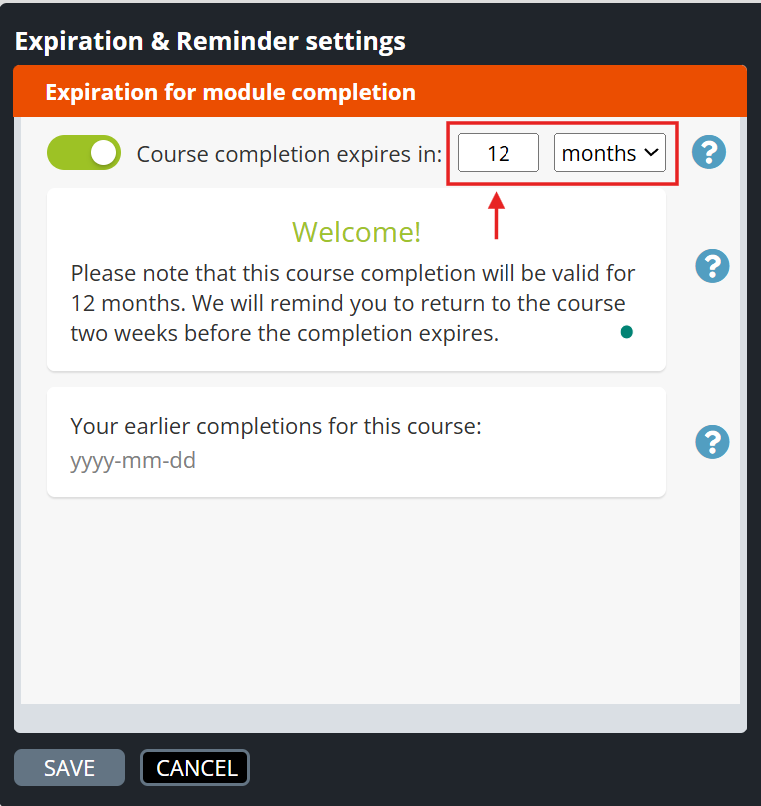
Since the validity period is defined as 12 months and a month is equivalent to 30 days, the number of days of validity is 360. If you want the validity period to be 365 days, specify it in years or days.
You can unpublish the course during its update. All course completions will be retained and will still appear in the statistics once the course is republished.
Alternatively, we offer a drafting feature that allows you to separate the published module from its draft version. This feature enables you to work on the draft version without the changes being immediately visible in the published and possibly already active version. If this sounds like a solution that might interest you, you can find more information on our Help page: https://faq.apprix.fi/builder-help-en/#pending
The commenting tool is designed so that multiple users can comment on the same element simultaneously.
If submitted comments do not appear under the confirmed or deleted comments of an element, it means that they were not saved successfully.
In such cases, the tool should display a red error message:
“Could not save comment, most likely due to a network error, please try again in a few moments.”
Possible causes of the issue:
- A network connectivity problem
- Other technical disruptions or connection issues with the server
⚠️ Note: If comments are not saved, they cannot be recovered later by any means.
If the learner’s most recent attempt is not incomplete (i.e. the learner has either never taken the course or the last attempt was completed), and they proceed beyond the Intro element, a new attempt is created.
The participant cannot access course content beyond the Intro element without generating a new attempt in the statistics, if the course does not use the Start new / Browse feature.
If the learner leaves the course without completing the attempt and later returns, they are directed to the incomplete attempt.
At the moment, the training content can only be exported with Apprix’s assistance. We can provide the material to you in Word format. This is a paid service, and producing one document typically takes about an hour.
The fastest way to create a language version is to duplicate the original module and update the content with translated text. You can do this yourself in Builder or order the work from Apprix.
If the link in your Nagging reminder message isn’t clickable, you can manually add it by following these steps:
- Open the module’s Nagging tool.
- Click the Reminder button to open the Reminder window.
- Highlight the link text (“link”) with your mouse.
- In the text editor that appears, click the Insert/edit link button.
- Enter the module link in the URL field and click Save.
Once saved, the module link should appear as a working hyperlink in the reminder message.
Logging in
Extra space before or after a password or username can sometimes cause challenges when copying and pasting the aforementioned information into the login fields. If the login credentials do not work immediately, check first both username and password for possible extra spaces. Next, try typing both username and password by hand.
❓ Can facilitators reset their own password if they forget it?
❌ No.
Facilitators cannot reset their Builder password on their own if they forget it.
️ What to do if the password is forgotten?
The facilitator should either:
- Contact:
helpdesk@apprix.fi
and request a new password
or - Ask someone in the company who has User Management rights
(e.g. an admin or system owner)
After receiving the new password:
- The facilitator will receive a temporary password by email
- Upon first login, they will be prompted to change it to a new one
Changing the password later
Facilitators can change their password at any time:
- Log in to Builder
- Go to the top right corner
- Select Menu → Change Password
A scenario example:
The trainee logs in to the E-Learning course with a link and performs the authentication and the course. After completing the course, the trainee copies the link from the browser URL field and sends it to another trainee. The second trainee completes the course using the link, which results in the name of the first trainee appearing in the diploma and in the statistics performance of the second trainee as well.
The first trainee has sent the second trainee her/his personal module link, which contains her/his personal user ID (please, see the number at the end of the link in the URL). The first trainee should have sent the Published module (E-Learning course) link, which does not contain her/his user ID.
Note! The user ID is created in the link once the trainee logs in to the E-Learning course.

If there are no submodules in the E-Learning course, the user is redirected to the element where s/he has interrupted the module.
If there are submodules in the course, the trainee will be redirected to the Submodules Menu page. From the Submodules Menu, the trainee can see which submodules s/he has already completed and also continue to complete the course. However, partially completed submodules should be started from the beginning of the submodule.
The identification marks of the previous course session will be agreed upon with Apprix during the project implementation phase. If an email address has been agreed as an identifier for a previous session, the trainee should sign in to SSO with their email address stored in connection with the previous session.
Should there be a different login method depending on if a course is for internal or external users?
SSO (Single Sign-On) login is in most cases intended for internal users. Consumer Login (Personal Passwords)/Email Registration is intended for external users, they can use this method to register themselves without the need for any internal organization IDs.
CASE 1: The main module is not published, and the sub-modules are published.
- If the user is logged in to Builder client environment, they will be able to complete the main module and sub-modules. In this case, statistics are collected in the sub-modules, but not in the main module.
- If the user is not logged in to Builder client environment, they will not be able to complete the course and will receive an error message that the course is not published.
CASE 2: Main module and sub-modules are not published.
- If the user is logged in to the Builder client environment, they can only complete the main module. In this case, even if they complete the entire main module, no statistics will be collected.
- If the user is not logged in to the Builder client environment, they will receive an error message that the course is not published.
That is, in its brevity:
- As logged in to the Builder client environment, the user can run modules, regardless of whether they are published or not.
- The user who is not logged in to the Builder client environment cannot complete unpublished modules.
- If the user is logged in to the Builder client environment they can complete the course, but only the main and sub-modules that are published will collect statistics.
The course is likely to have restricted access based on IP addresses. IP address restrictions do not restrict those logged in as the course administrator, which is why the course opens for them.
You get the error message due to the broken link. That is, the link is broken for some reason, and when you click “continue,” that error message appears because the environment cannot be found due to the broken link. Please, enter the entire link again. This should fix the problem.
Builder Login and Email Registration (formerly “Personal password” / “Consumer login”) are two different things.
To log in to the Builder client environment (as Builder’s editor), you need to use the login page at https://builder.apprix.fi/b/. The password cannot be reset on this login page. You may request a new password from Apprix (helpdesk@apprix.fi) or directly from the person in charge of your organization.
The login method for Email registration is activated from the gear icon of the module. On this login page, trainees log in to the course. If trainees have forgotten or lost their password, they can request a new password by clicking the Forgot Password link.
This is a different login method than when logging in to the Builder client environment.
External collaborators cannot log in to the online course because the module has the SSO login method enabled (this option is for internal employees).
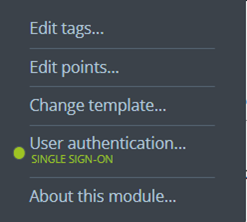
If you want to make the course accessible to external collaborators, we recommend turning on a non-SSO login method. For example Email registration or Tax Number Check. In the User Authentication settings under the module’s gear icon, you can select which authentication method the user will have to use to log in when accessing the module.
See our Help page for more information about user authentication methods already implemented in Builder to identify course participants.
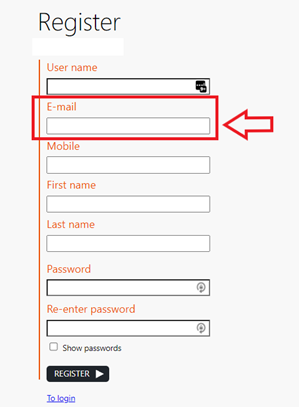
The verification code is sent to the email address that was entered in the “E-mail” field. If the email address is incorrect, the verification code will never reach the user.
When implementing a new login method, it is taken into account what kind of changes the implementation might require. After changing the login method of the module, the statistics may record different information about the enrolled trainees.
SSO stands for Single Sign-On.
SSO is a login method that allows users to log in only once to access different services. SSO is one of the sign-in methods used for Builder training and can usually only be used by an internal employee.
An external person is unlikely to have SSO credentials, which means that they will not have access to training using the SSO login method.
After the login method changes, the user logs in with a new method and may have to enter different information.
Changing the login method also changes the criteria for searching past performances.
This can have the effect, for example, that a session started with a previous login method may not be found when a user logs in with a new login method because the logged-in user’s information does not match the information of the previously started session.
The Landing Page searches for performances based on its specific login method.
Suppose no course performances are found for the linked training using the criteria specific to the Landing Page login method. In that case, the Landing Page will indicate that the linked training has not been completed.
Using a login method such as SSO is unsuitable for training on the same device because, after the first login, Builder remembers the logged-in user and, on subsequent occasions, allows access to the course without asking for login information. For example, if the first user has logged in to training with their SSO credentials and another user accesses the same training on the same device, the first user’s credentials will be recorded in the performance because they were still logged in.
When a course is published in Builder and uses MyCourses LMS for login settings, the user should access the course via MyCourses to ensure proper login and progress tracking.
If the user has been provided with a Builder link such as:
https://builder.apprix.fi/b/e/xxxxx/index.html?mid=…
…it bypasses MyCourses and may prevent the course from opening. The correct link always begins with:
https://mycourses.apprix.fi/index/dashboard/…
Recommended actions:
• Ensure the user receives a MyCourses link, not a direct Builder publication link.
• It may also be helpful to verify that the course is correctly linked to the user’s MyCourses and that the user has the necessary access rights.
Video
If there are problems when streaming videos:
1) Try using a different internet browser
- Google Chrome is the most reliable browser for PC users
2) Try clearing your entire cache.
Clearing your entire cache can help with many of the streaming issues you might be running into as well as lots of other problems you might experience.
3) It could be a hardware acceleration issue. Check the hardware acceleration settings from your device.
If there are problems with Vimeo videos (the videos fail to start playing):
Here are some potential causes that can prevent the videos from playing:
- a browser extension
- an antivirus
- a firewall
- an accountability program (such as Safe Eyes or Covenant Eyes)
If you are aware of any such software on your device, you could try temporarily disabling it to see if that allows the videos to play. Once you discover which of these may be blocking the videos, you can try adjusting the settings to allow vimeo.com.
Other Possible Causes:
If you are using a proxy server, that could also be preventing the videos from being delivered to your device properly. If you are in an office network, you may want to contact the network administrator or IT specialist of your organization.
The final possibility is that your browser does not have Transport Layer Security (TLS) enabled. Most modern browsers have TLS enabled by default. To enable TLS, follow the steps in the browser’s settings.
If you cannot embed media from a streaming service, it may be because Builder doesn’t yet allow embedding content from that service.
Please contact our support team (helpdesk@apprix.fi), and we will check if we can add the streaming service to the list of allowed services.
You can embed longer videos from streaming services such as YouTube, Vimeo, Microsoft Stream (on SharePoint), Google Drive, Dreambroker, Streamio and Icareus Suite.
If you don’t want to use a streaming service, you can optimise your video file for web use and upload it to Builder as a file. Here’s a guide to optimising a video for the web that we use ourselves – you can optimise one video yourself in about 15 minutes, and we can do it for you via our Helpdesk (helpdesk@apprix.fi).
Here you can find the instructions: https://faq.apprix.fi/builder-help-en/#video
How do I optimise the video file size for web use? – Click on the link below.
The embed code can be found in very different places in different services, so please check the Help page of the source service to see where you can get it copied.
If you cannot embed media from SharePoint, it may be because your company’s SharePoint domain is not yet enabled in the Builder environment.
In this case, don’t hesitate to contact our support team (helpdesk@apprix.fi), and we will add the domain to the list of allowed ones.
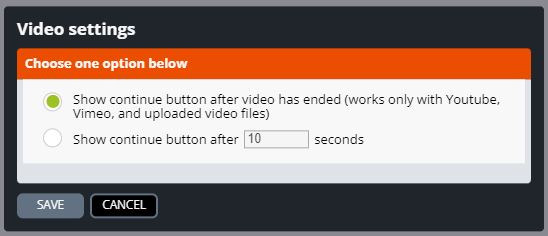
In the Video element settings, there are two options to choose from:
- in the first, the forward button appears when the video is finished (only works for Youtube, Vimeo and uploaded videos)
- in the second, the forward button appears after a specified time (time is given in seconds).
In this setting, the forward button only appears after the specified time has elapsed, regardless of whether the video is being fast-forwarded.
We recommend putting a note at the beginning of the video telling you to finish watching the video without fast-forwarding.
Note!
Video streaming is also affected by the internet connection, so even if your connection is momentarily slow and the video has not had time to load, it may get stuck waiting for the video to finish downloading.
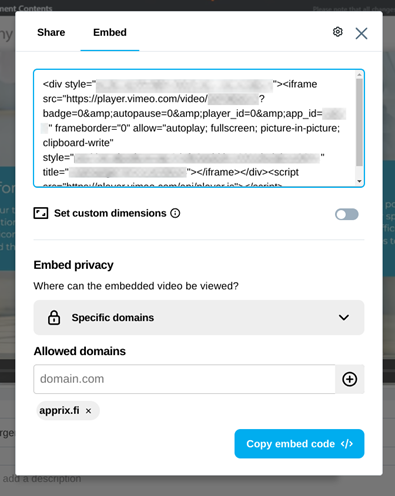
If you have a Vimeo channel from which you want to embed a video in Builder, you need to set the correct settings for the video to be visible.
Sign in to your Vimeo channel.
If the video is not yet on your channel, select Upload, then Choose files, select the video file you want to import to your Vimeo channel, and then upload it to Builder.
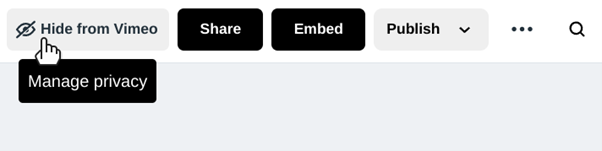
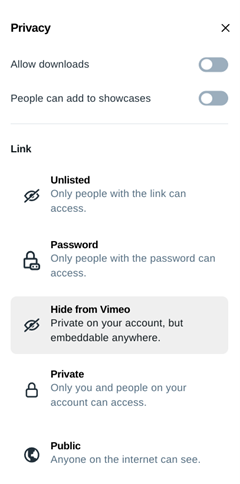
Select the video you want to embed in Builder. Select the video from the Manage privacy ( eye icon), and then, under the Link heading, select Hide from Vimeo. This selection limits the video’s visibility so that it can only be viewed with the embed code and not with a direct link to the video. It will not be publicly visible on Vimeo to other users.
Get the video embed code. You can find it on the video page by selecting Embed, copying the text box’s contents, or clicking Copy embed code. From the same dialogue, you can restrict the video’s visibility to only be viewed on Apprix sites by selecting Embed privacy under Specific domains and adding the apprix.fi domain to the Allowed domains.

There is no limit to the number of videos that can be used in the training, but a SCORM package can only be created if the total size of the files to be included (including videos) does not exceed 200 MB.
If the video uses a non-standard resolution (e.g. 1936×1056) and a low frame rate (e.g. 9.602 fps), either one or both may cause the video to fail to play in the browser. Please ensure that the video used in the module plays correctly in the browsers used by course participants.
For example, if participants are using Microsoft Edge, the video used in the video element should play normally when the video element is opened in preview mode in the Edge browser.
How can I check the video’s resolution and frame rate?
You can check the video’s quality and frame rate using the VLC application (must be installed separately).
To view the video’s resolution and frame rate:
- Open the VLC application and select the video file by choosing Media > Open File from the top menu, then select the desired video.
- Choose Tools > Media Information, then open the Codec tab in the window that appears.
- In the list view, the video resolution should appear under Video resolution and the frame rate under Frame rate.
We recommend changing the video resolution to at least 1920×1080 and the frame rate to at least 30 fps (frames per second). This video quality is supported by nearly all browsers. If you need help converting the video to a format that is better supported by browsers, Apprix HelpDesk is happy to assist—please contact them at helpdesk@apprix.fi.
Instructions for embedding a video from the DreamBroker streaming service into Builder:
https://faq.apprix.fi/builder-help-en/#video
Once the video has been embedded, make sure the video content loads correctly for the participant:
- Open the video element in Preview mode. If the video element displays an error message such as “This content is blocked. Please contact the site owner for assistance.” or similar, this likely means that Builder is blocking the content from loading.
- See “Why can’t I embed a video or other media from a specific streaming service?”: https://faq.apprix.fi/en/#c8d1823da2093692a
- If the video element using the embed code from DreamBroker redirects the user to the Microsoft Login page (https://login.microsoftonline.com/) before the user can play the video, this indicates that viewing the video requires signing in with a Microsoft account.
- The facilitator should verify whether the intention is for the DreamBroker video to be viewable only by signed-in users (e.g., those with specific Microsoft accounts). If that is not the intended setup, the video settings in DreamBroker should be adjusted so that login is not required. After that, the video becomes public and accessible to anyone.
The video may not play in the LMS because the streaming service’s video settings do not allow embedding under the LMS domain where the SCORM‑package content is loaded. Since the video plays in Builder, the video settings in the streaming service most likely allow embedding under the Builder domain (builder.apprix.fi).
In general, this issue can be resolved by allowing the video to be embedded under the required LMS domain in the streaming service’s video settings. For example, in Vimeo, this can be done by navigating to the video’s settings page and editing the list of domains where embedding is permitted. More information about adjusting Vimeo video settings: https://help.vimeo.com/hc/en-us/articles/12426259908881-How-to-embed-my-video
If the Builder training uses a video embedded from Apprix’s Vimeo channel, and this specific training has not previously been exported as a SCORM package to the customer’s LMS, please provide us with the LMS domain under which the SCORM content is displayed. This allows us to add the domain to the list of permitted embedding domains in the Vimeo video settings.
Zip/SCORM files
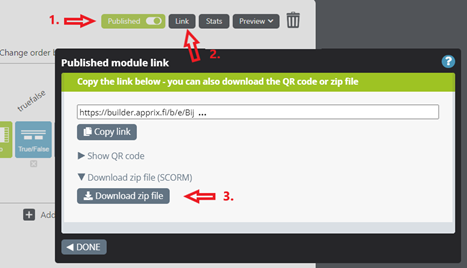
You can download a zipped file from Builder by following these steps:
- Choose the module that you wish to upload to your learning environment.
- Choose the Edit button. Edit Module window opens.
- Choose the Link button. The Published module link pop-up window opens.
Now you can download the module’s zipped file.
A new zip file needs to reloaded to the learning management system if someone from Apprix makes one or more of the following changes to the module content:
- An image is replaced with a new one that is not found in the image library
- If changes are made to the appearance of the training module (e.g. changes in font size)
- Element functions are modified (check from Apprix)
If someone from your organization makes one or more of the following changes to the module structure or its content:
- A new image not previously found in the image library is added to the module
- A new element is added to the module that was not available in the element selection when the zip file was downloaded from Builder
- When videos or audio files are added to the module
When do I not need to download a new zip file?
- When editing text content in the module
- When changing the order of the existing elements in the module
- When an element is deleted from the module
- When adding an old element
About images in zip files
If you upload an image to a module and want the image to be available to be used by other users later, you need to select the option Show uploaded file in library. Otherwise, the image will only be available for that specific element in that specific module. If the image is from outside Builder’s image library, it must be publicly accessible to be visible in the module. Images added to the image library before downloading the zip file will be automatically updated to elements if used to replace images existing in the module. However, if an image added to the module did not exist in the image library before downloading the zip file, a new zip file must be downloaded from Builder for the image to appear in the zip file.
Note! If the zip file is used in SCORM environment, it is possible to update images on Builder website without having to download a new zip file. Like other publicly available images online, images in the Builder image library can be referenced directly by adding a link to Link to an image online field
https://builder.apprix.fi/b/e/module_type_id/img/uploaded/KUVANNIMI
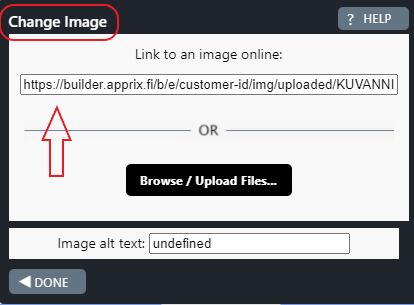
Please contact Apprix helpdesk at helpdesk@apprix.fi for the module type ID.
A zip file downloaded from Builder can be renamed to match, for example, the training name. This does not affect the functionality of the training (the zip file).
To be able to test a SCORM file, take a zip file from the desired module and put the zip file in the environment that runs SCORM-files.
All you have to do is download the zip file from the main module.
It cannot be achieved independently but with a little help from us, it is possible. We will prepare a SCORM element for you and place inside the course that was produced with another tool. In this case, a Builder module consists of
- an Intro element at the start (with possible user identification),
- a SCORM element as mentioned above. The element contains all the course contents encapsulated in one package, and
- a Finish element at the end that forwards the trainee’s performance data to Builder statistics.
Oftentimes, these courses work immediately after installation, but in some instances there might be, for example, external links that need to be fixed.
Builder supports SCORM 1.2 standard.
The current Builder zip package format is SCORM 1.2.
If you have a module’s Edit rights, you also have the right to publish it and to download the module’s Zip/SCORM file.
The videos are often pretty large, so sometimes, the zip file exceeds the maximum file size. The total size should not exceed 100Mb. We recommend optimising the video file size.
Here you can find the instructions: https://faq.apprix.fi/builder-help-en/#video
How do I optimise the video file size for web use? Click the link below.
Note! If requested, Apprix can also optimise the video size for you.
Reducing the size of a video file can compromise its quality. If you want to keep your videos high-quality, instead of reducing the file size, we can allow embedding from your SharePoint address into Builder. To embed from SharePoint, we need the embed code to add the domain to the list of allowed domains correctly.
An online course cannot be completed unless it has been published. In practice, a user attempting to complete it will not be able to download it, nor will it be available on the customer’s system.
The SCORM packages downloaded from Builder are SCORM 1.2 version, and they work in Vuolearning LMS because the system supports this standard.
This is because SCORM packages are not designed to work in local browsers, but rather within an LMS (Learning Management System) like Moodle. When the SCORM file is opened locally, error messages appear in the browser’s console.
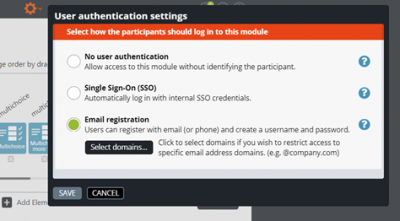
To use the SCORM package in a course, the User Authentication setting must be changed to “No user authentication.” Once this is done, the SCORM package should work properly in Moodle.
Instructions: How to change the User Authentication settings
- Open the Edit module view of the course module.
- Click the gear icon at the top of the window and select User Authentication…
- In the User Authentication Settings window, make sure the “No user authentication” method is selected.
- If another authentication method is active, disable it.
You cannot edit the content in Builder if it wasn’t created there.
SCORM package content is editable in the system or tool where it was originally produced or exported.
User Rights
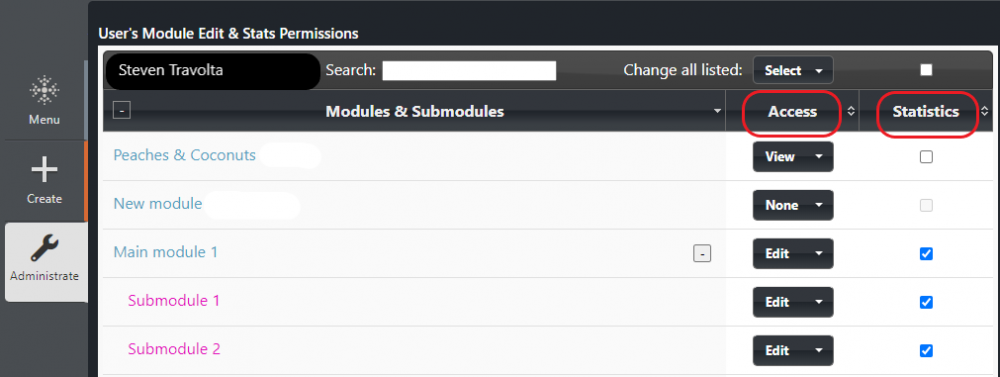
If you want to grant editing rights for a specific module, please do the following in the Administrate view:
1. Select the user
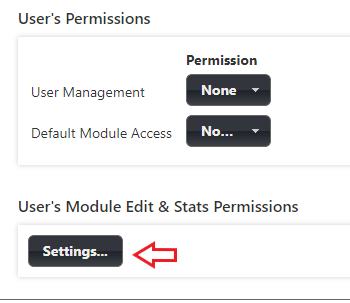
2. Click the Settings … button under the User’s Module Edit & Stats Permissions. A new pop-up window opens.
3. Choose option View (default value) in the Access column to those modules that you wish the user can view, but not edit.
4. Choose option Edit to those modules that you wish the user can edit, and if needed you can also give the statistics viewing rights.
Now the user will be able to edit the module and view the statistics if the access is granted.
First, identify who in your team has the User Management role.
This person can manage Builder access rights via the Administrate menu, including adding, editing, or removing users.
You can find more information about access management on https://faq.apprix.fi/builder-help-en/#administrate.
If needed, Apprix Helpdesk (helpdesk@apprix.fi) can also assist by adding new facilitators or adjusting user management settings.
1.Open the module Administrate view.
2.Choose the name of the user.
3.Select the Settings button under User’s Module Edit & Stats Permissions
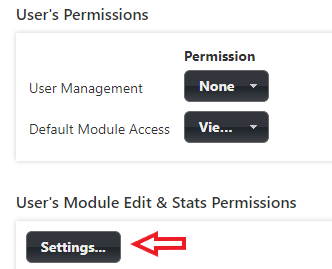
4.In the User’s Module Edit and Stats Permissions pop-up window, select the module’s View option under the Access column, to allow the facilitator to look at the statistics.
Note! If None option is selected, it will not be possible to select the Stats button, since it is disabled.
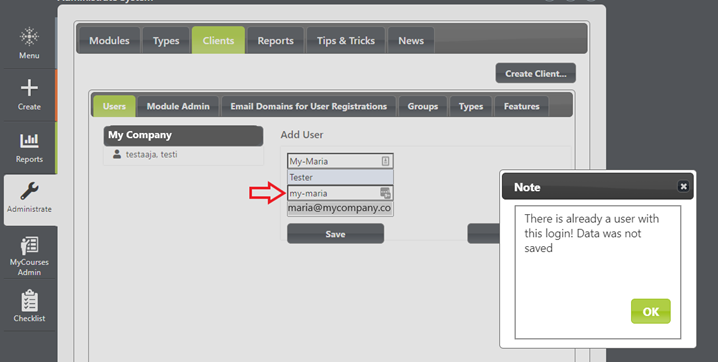
There is already in Builder a user (facilitator) with the same login. Please, create a different login.
Absolutely! The Builder users with administator rights in your organization can decide exactly who has the rights to create, edit and access Builder modules. The rights can also be modified when necessary.
Facilitator editing rights are assigned as follows:
First, set the “Module’s accessible parameter” to “On”.
Then, define the value for the “Default Module Access” parameter:
- “Edit”: if the facilitator should be able to edit all modules.
- “View”: if the facilitator should be able to preview and duplicate all modules, but not edit them.
- If you select “View”, you can define the facilitator’s editing rights for individual modules by clicking the “Settings” button under “User’s Module Edit & Stats Permissions”.
When you click the button, a window will open listing all available modules. You can assign the facilitator specific rights (edit, view, none) for one or more modules. In this same window, you can also grant access to view statistics.
Answer: Yes.
User Management settings:
- Edit: The user has the right to add new users and assign them the necessary permissions. This also includes the ability to modify their permissions and those of other users.
- None: The user does not have the right to add new users or modify any permissions.
✅ Yes, it does!
When a user is assigned Default Module Access = Edit, they are granted the right to:
- ✏️ Edit all existing and future modules
- View module statistics
What do the Default Module Access settings mean?
| Setting | User rights |
|---|---|
|
The user can only see the modules they have created |
|
The user can preview and duplicate all modules, but cannot edit or view statistics |
|
The user can edit and view statistics for all current and future modules |
⚠️ Note: Module-specific permissions override the default setting
Even if a facilitator is given Default Module Access = Edit, their rights may still be limited if they have previously been assigned module-specific permissions in the User’s Module Edit & Stats Permissions window.
Important:
➡️ Module-specific settings (View/Edit) will override the Default Module Access setting for those specific modules.
Example Scenario
Scenario:
- The facilitator has Default Module Access = Edit
- However, in the User’s Module Edit & Stats Permissions window, two modules are set to View
Result:
- The facilitator can edit all other modules
- For the two modules set to View, the facilitator can:
- View the content
- Duplicate the content using the Duplicate button
- ❌ Cannot edit
- ❌ Cannot view statistics
- Note! Another facilitator created these modules
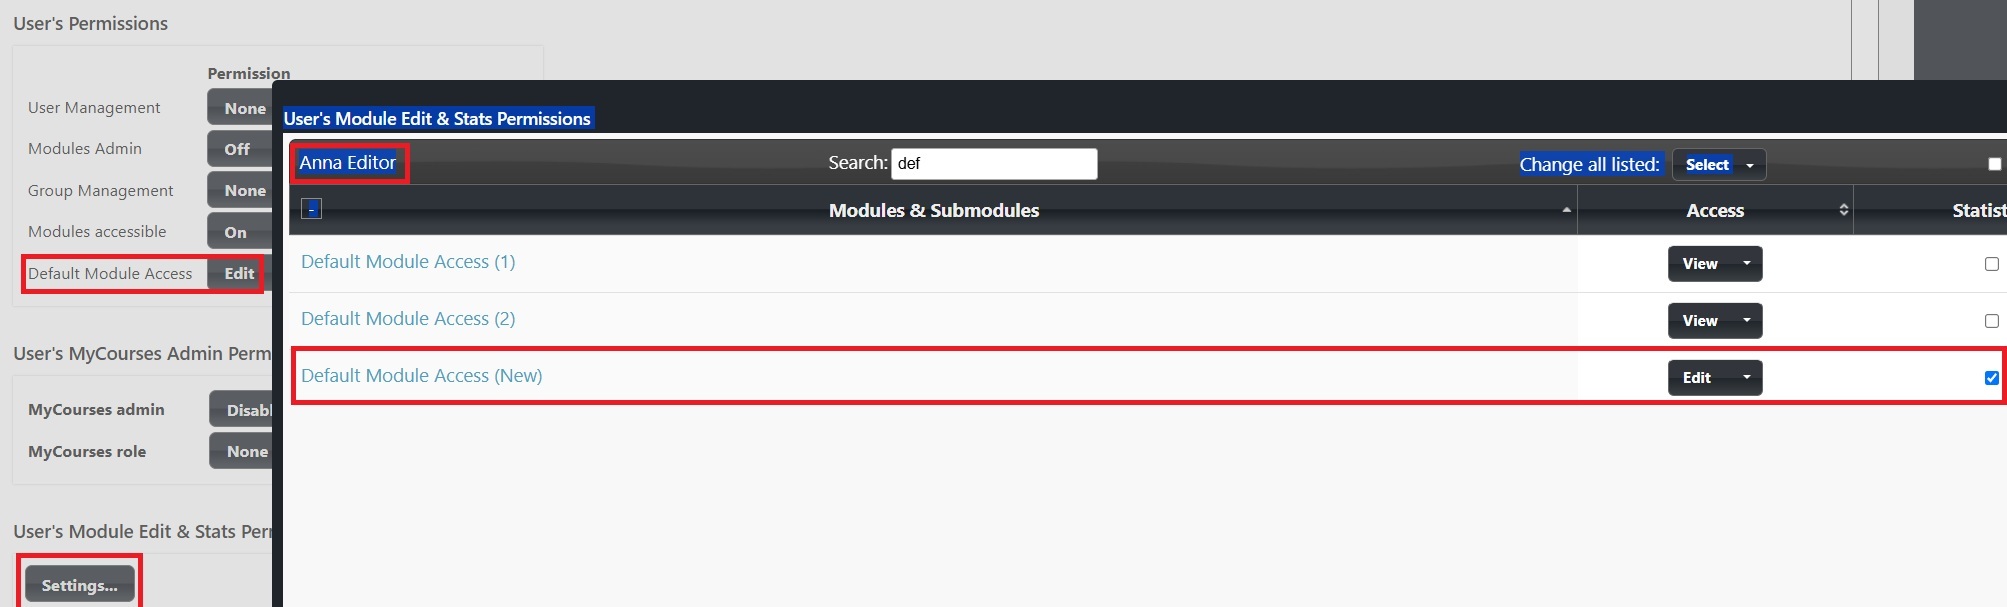
️ Visual References
Image 1 – Anna Editor has Default Module Access = Edit.
Two modules are set to Access = View. Anna can view and duplicate them, but cannot edit or view statistics.
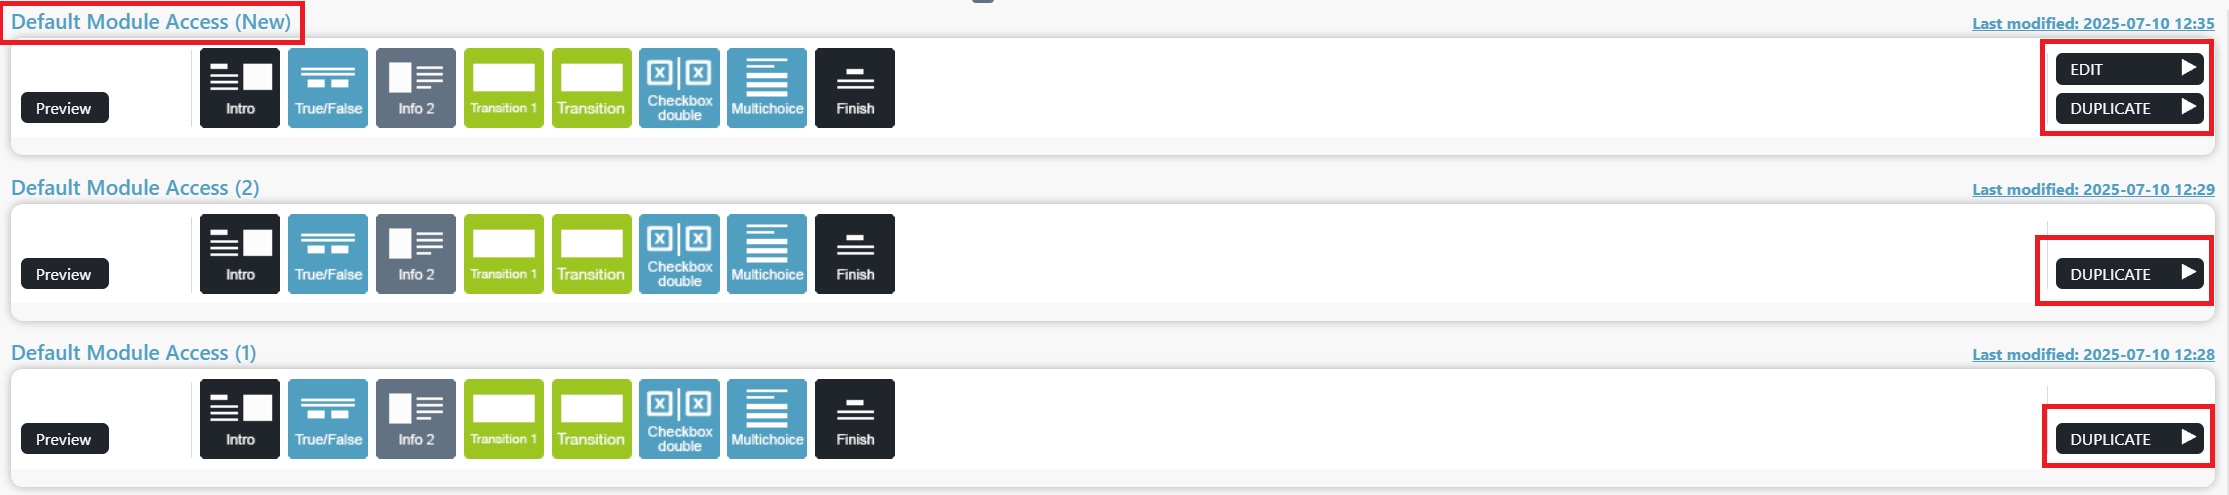
Image 2 – In the Builder view, Anna can edit all modules except those that have been explicitly set to View in the module-specific permissions.
We use the Summary Report tool, which compiles module completion data in one place. Access rights can be granted to supervisors, allowing them to track their team’s course progress.
You can find more information at: https://faq.apprix.fi/builder-help-en/#summary-reports
Below is a Help link for you, where you can find more information about sharing a preview link to the module:
Preview link sharing: https://faq.apprix.fi/builder-help-en/#previewingmodules
Modules and Submodules
You can preview the training:
- by clicking the Preview button near the module name. In this case, you will start from the beginning of the training.
- by hovering your mouse over any element in a module and by clicking the Eye icon that appears in the upper right corner of the element. Clicking the eye icon will take you to a preview of that element and from there, you can preview the module forwards or backwards.
- From the gear icon on top of the page in the Edit module view
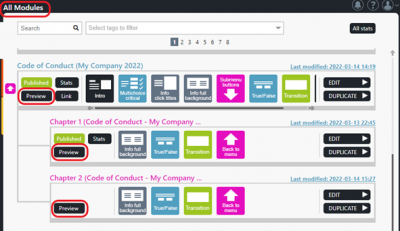
”All Modules” window
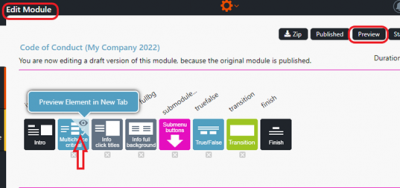
”Edit Module” window
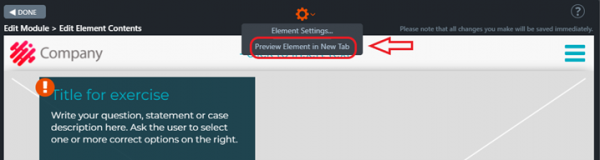
In the element
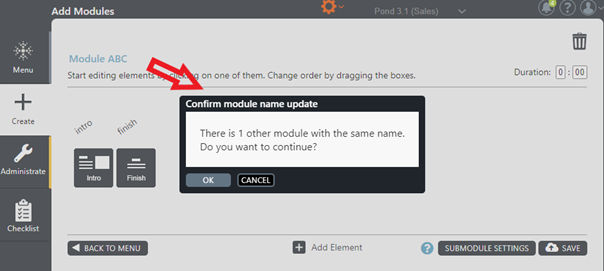
Yes. There can be two or more modules with the same name. When you save a module with the same name as another one, Builder will inform you.
When you duplicate a published module:
- The duplicated main module will be in unpublished status
- If the submodules are in published status in the original version, these will be in published status also in the duplicated version.
Note! If the submodules are not in published status, then these will not be visible/accessible when the entire training is previewed/performed.
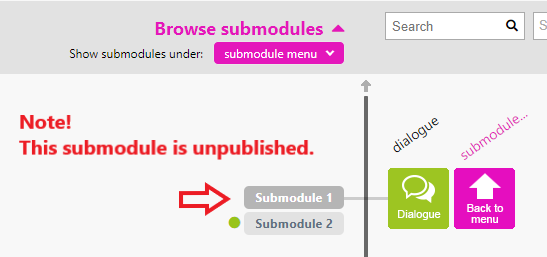
Submodule 1 is not visible in Preview mode since it is not published (there is no green dot before the submodule’s name).
In the main module, the Guard by IP setting has not been activated. Instead, it has been activated in the submodules. If a user tries to view or access the site from an IP that is not provided, they will not be able to access the site.
Solution: If a training must be performed outside the IP range, Guard by IP setting must be deactivated (from the submodules).
Note! If Guard by IP setting is enabled and a user tries to view or access the training from an IP that is not provided, the user will not be able to access the training.
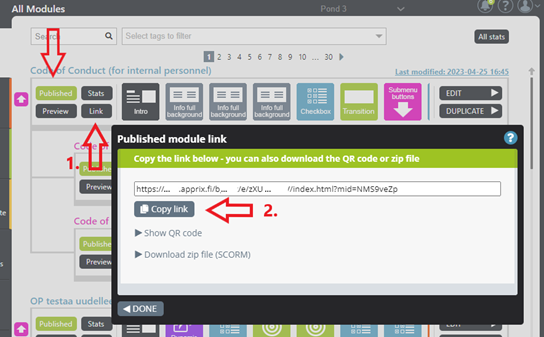
The module is published when the (green) Published and the (black) Link buttons appear on the left side of the module’s element list in the All Modules view.
Click on the Link button whenever you need a link to the published module (a pop-up window with the link will open when you press the Link button).
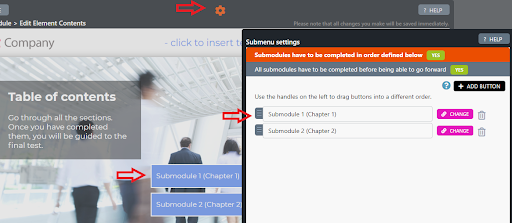
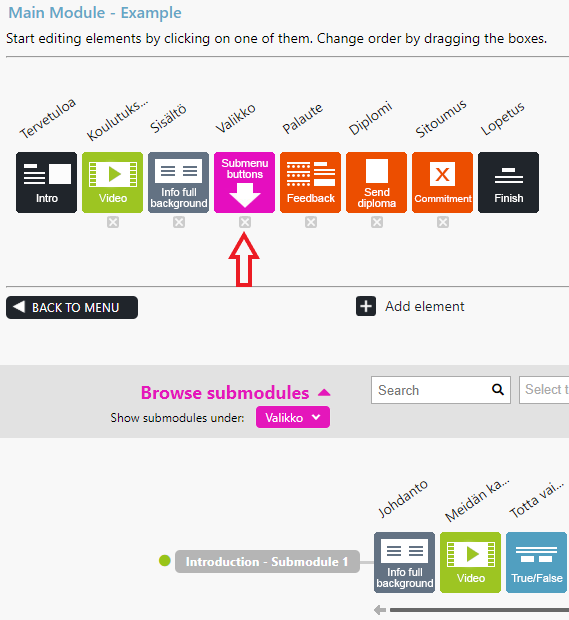
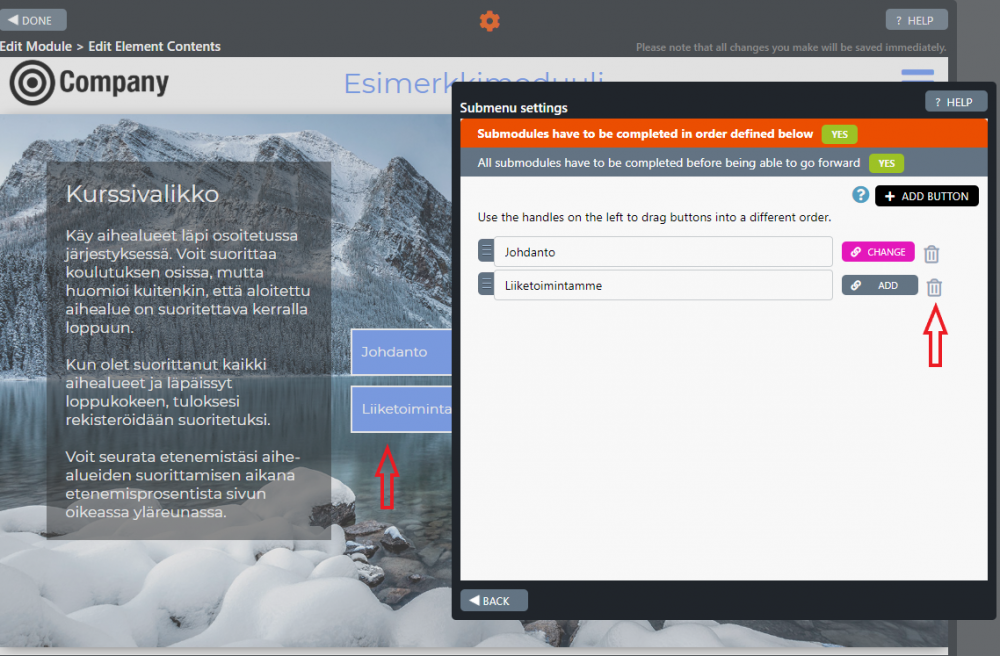
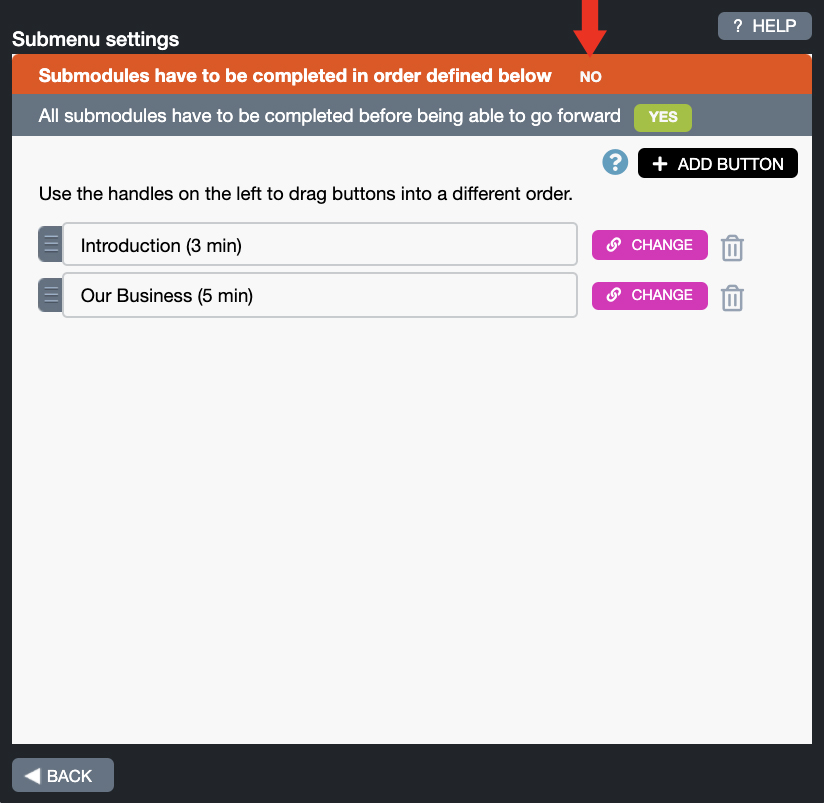
Check in the main module the Settings of the SubMenu Buttons element.
If the option All submodules have to be completed before being able to go forward is not selected (value is “NO”), then the move forward arrow will be visible in the Submenu Buttons element.
If you select YES option instead, the course participant will not be able to move forward in the main module, but s/he must complete all submodules first.
Once the trainee has completed all submodules, s/he must click the Move Forward button in the Submenu Buttons element and reach the Finish element. Now her/his performance will be updated in the Big Data’s view in the statistics (from Unfinished = 0 to Finished = 1). If the trainee logs out or closes the browser before the Finish element her/his performance will not be marked as completed in the statistics.
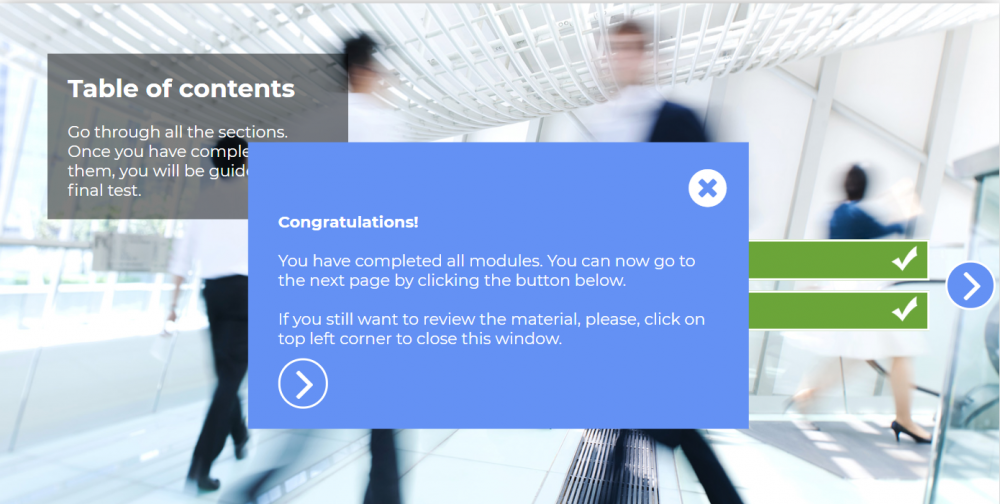
Submenu Buttons element. Both submodules have been completed. The trainee can now move forward in the main module (the Move Forward button will appear) and complete the training.
Note! If there is a checkmark at the top of the sub-module bar, this means that the sub-module has been completed successfully.
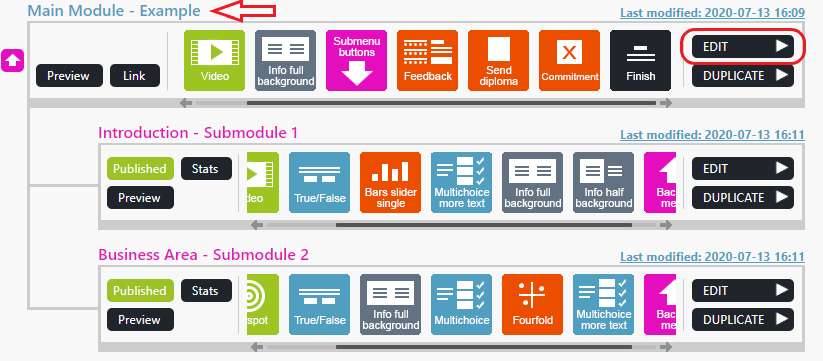
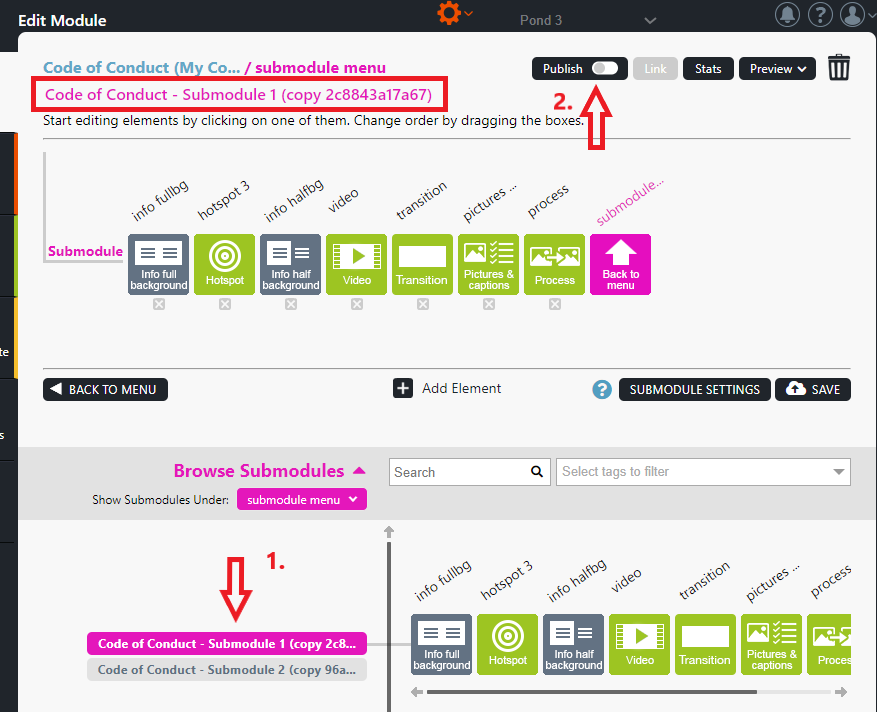
- Click the main module’s Edit button. The Edit Module window opens.
- Select the submodule that you would like to rename from the list of submodules. The submodule name will appear in pink color at the top of the window.
- Select the submodule’s name and rename it.
- Save by pressing the Save button.
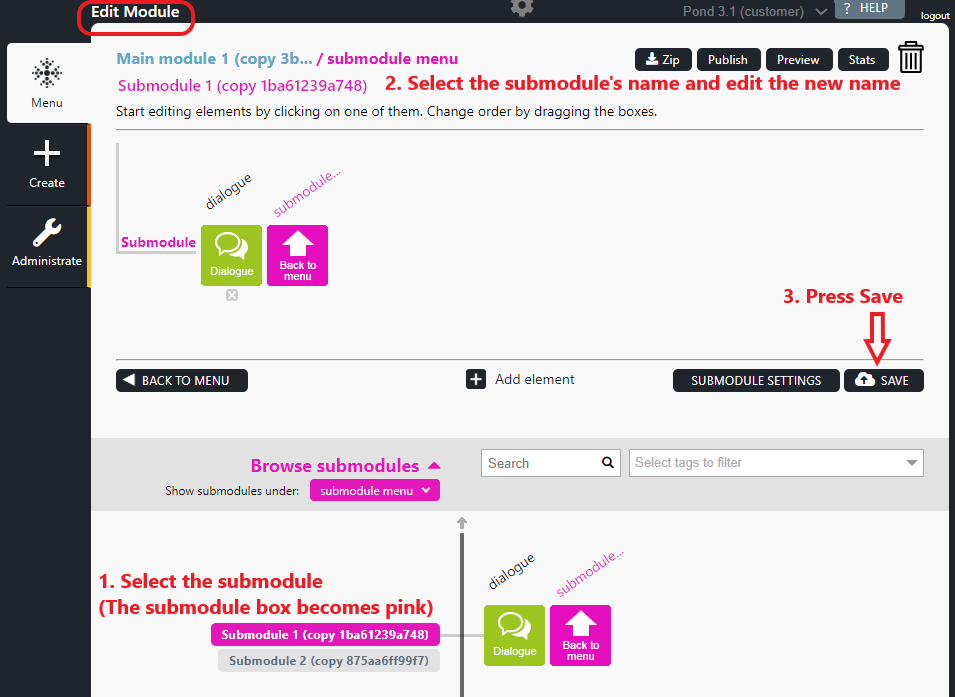
Note! Please remember also to check if you need to rename the submodule in the Submenu Buttons element.
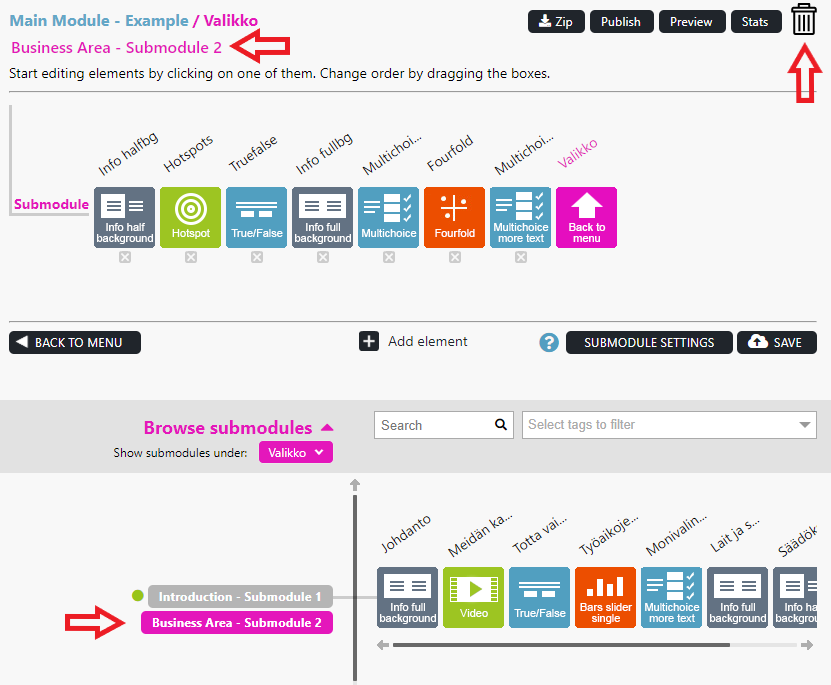
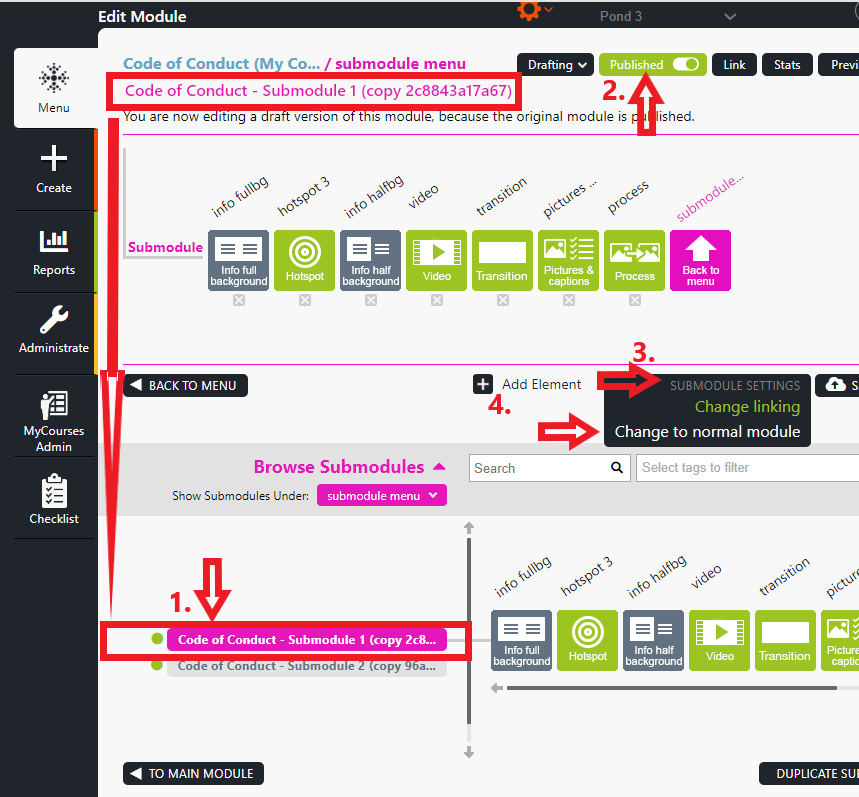
If you need to unlink a submodule from its main module, please complete the following steps.
- Select the main module and click the Edit button. The Edit Module window opens.
- Activate the submodule that you would like to unlink by clicking the submodule name under the Browse submodules list (in pink colour).
- The submodule name appears at the top of the window, under the main module name. This means that the submodule is now ready to be unlinked from the main module.

4. Click the Submodule Settings button. Two options are displayed: Change Linking and Change to Normal Module.
If you choose Change Linking the Change Linking pop-up window opens. Here you will find a list of modules that contain the Submenu buttons element.

5. Click the pink module name to which you want to link the submodule. The Submenu Settings pop-up window of the selected module Submenu Buttons element opens.
Here you can choose how to link the submodule to the current module, for example by adding a new button for the new submodule and linking the submodule to the button by clicking the pink Select button next to the added button field, or by linking the submodule to an existing submodule button by clicking the Select button next to an already existing button field.
In case you don’t want to link the submodule to any main module, you can choose in the Change Linking pop-up window Not now, link to a menu later at the lower right corner of the window. In this case, the submodule will become an orphan (not linked to any submodule structure).
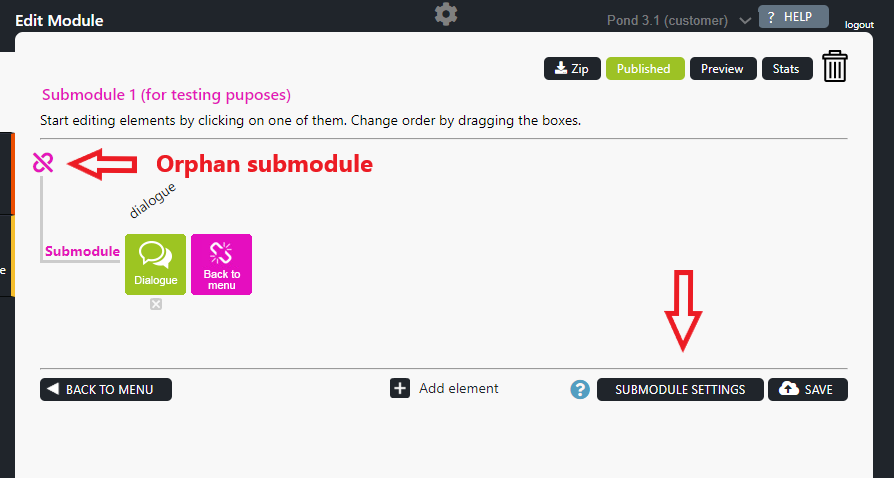
From the Submodule Settings you can later choose if you want to link the submodule, to change it to a normal module or to delete it by selecting the trash icon.
If you need to remove and delete a submodule from its main module, please, complete the following steps.
- Select the main module and click the Edit button. The Edit Module window opens.
2. Activate the submodule that you would like to remove (delete) by clicking the submodule name under the Browse submodules list (in pink colour) in the Edit Module window.
The submodule name will appear at the top of the window, under the main module name. This means that the submodule is now ready to be removed from the main module and deleted.
3. Click the module name and then the Trash basket button on the upper right side.
Builder will ask you if you really wish to remove the submodule.
4. Select OK button. The submodule will be removed from the main module and deleted.
Note! Please remember to remove the submodule also from the main module Submenu Buttons element if the submodule text box is not needed anymore.
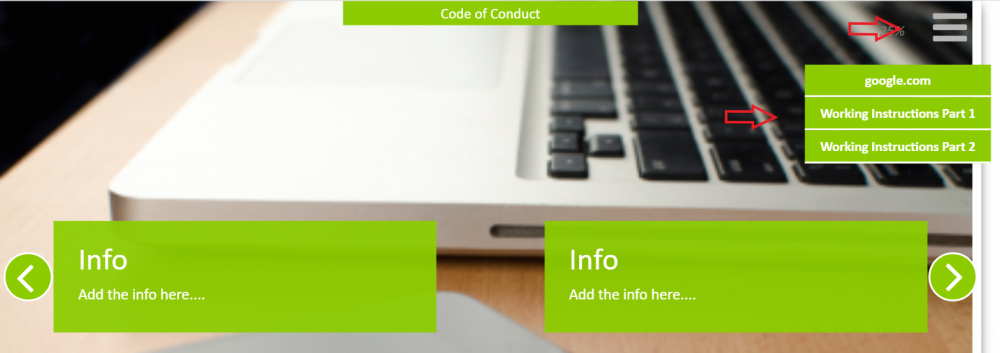
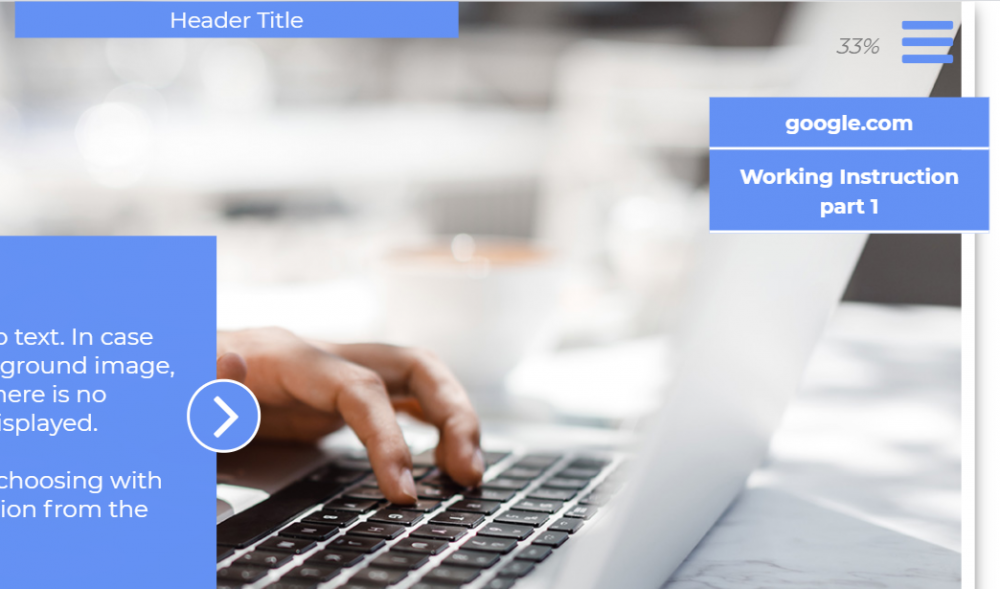
Follow these instructions to add files and links that are to be available to trainees throughout the module.
Hamburger button
The hamburger button (aka hamburger menu) is placed at the top right corner of an element. Clicking on the button opens a list of files and links, ready to be used by trainees during the training.
Editing Instructions
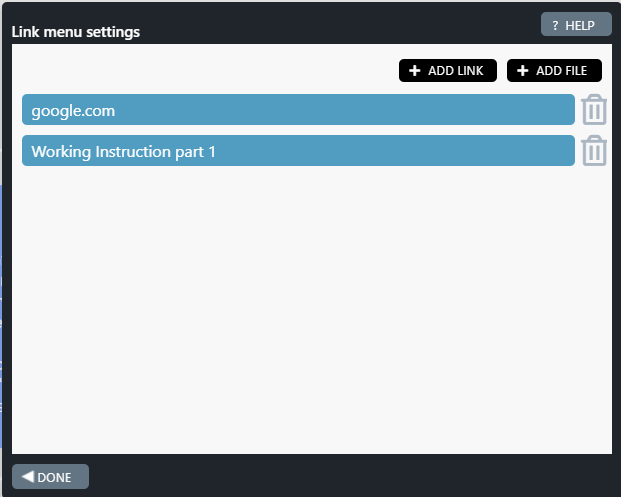
Clicking on the hamburger button opens the Link Menu Settings pop-up window. In this window, links (e.g. HTTPS://www.google.com/) and files can be added (pdf, doc/docx, xls/xlsx, ppt/pptx, txt/csv, zip) into the hamburger.
Note!
Links and files
- placed in or removed from the hamburger button of any element are updated accordingly in all elements in the module automatically.
- added in the main module are not updated in the submodule and vice versa, since these are module-specific.
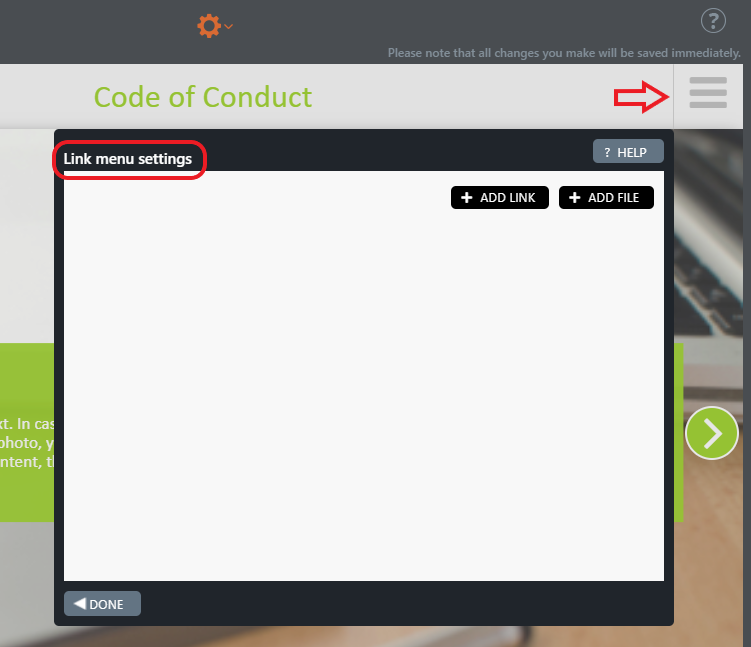
+ ADD LINK button
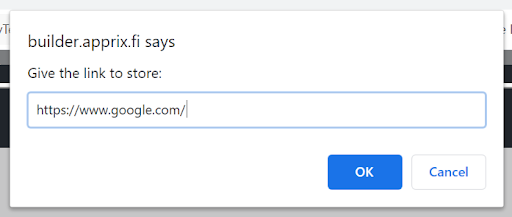
Click + ADD LINK button if you need to add a link(s) into the hamburger. The Browse Media Library pop-up window will be opened. In this library, you can find a list of available links, previously added. If the link that you need is not included in the library yet, click the orange Add new link… button. A new pop-up window is opened; it requests to provide a name for the link to be displayed in the media library. Enter the name of the link, e.g. google.com and press OK. A new pop-up window is opened, it requests to give the link to be stored in the media library. Type the link name, e.g. https://www.google.com/ and press OK. The pop-up window and the Browse Media Library are closed.
In the Link Menu Settings, click the + ADD LINK button again. In the Browse Media Library pop-up window, select the needed link and click Insert Selected button at the bottom right side of the window. The link now will appear in the Link Menu Settings pop-up window.

Select Done if you do not need to add more links. The link is now available in the hamburger button.
+ ADD FILE button
Click + ADD FILE button if you need to add a file into the hamburger button. The Browse Media Library pop-up window will be opened. In this library, you can find a list of available files, added previously. If the file that you need is not included in the library yet, click the orange Add new file…button.
Note! Tick box Show uploaded file in library if you wish that the file is included in the File Library.

The File Explorer window is opened. Select the file to be included in the media library. A new pop-up window is opened; it requests to provide a name for the file to be displayed in the media library. Enter the file name and press OK. The pop-up window and the Browse Media Library are closed.
In the Link Menu Settings, click the + ADD FILE button again. In the Browse Media Library pop-up window, select the needed file and click Insert Selected button at the bottom right side of the window. The file will appear in the Link Menu Settings pop-up window. Select Done if you do not need to add more files. The file is now available in the hamburger button.
Files and links included in the Link Menu Settings are now available in all elements of the module. If you need to remove a file or a link, click the Trash Can icon on the right side of the link/file name.
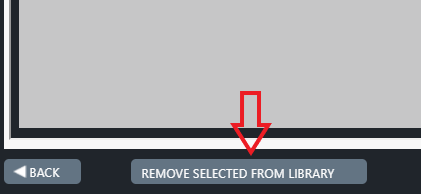
If needed, you can also remove a file/ link from the Media Library, by selecting the file/link and clicking REMOVE SELECTED FROM LIBRARY button at the bottom left side of the pop-up window. Note that the file/link will be removed only from the Media Library, but not from the module(s), if the file/link is stored in the element Link Menu Settings pop-up window.
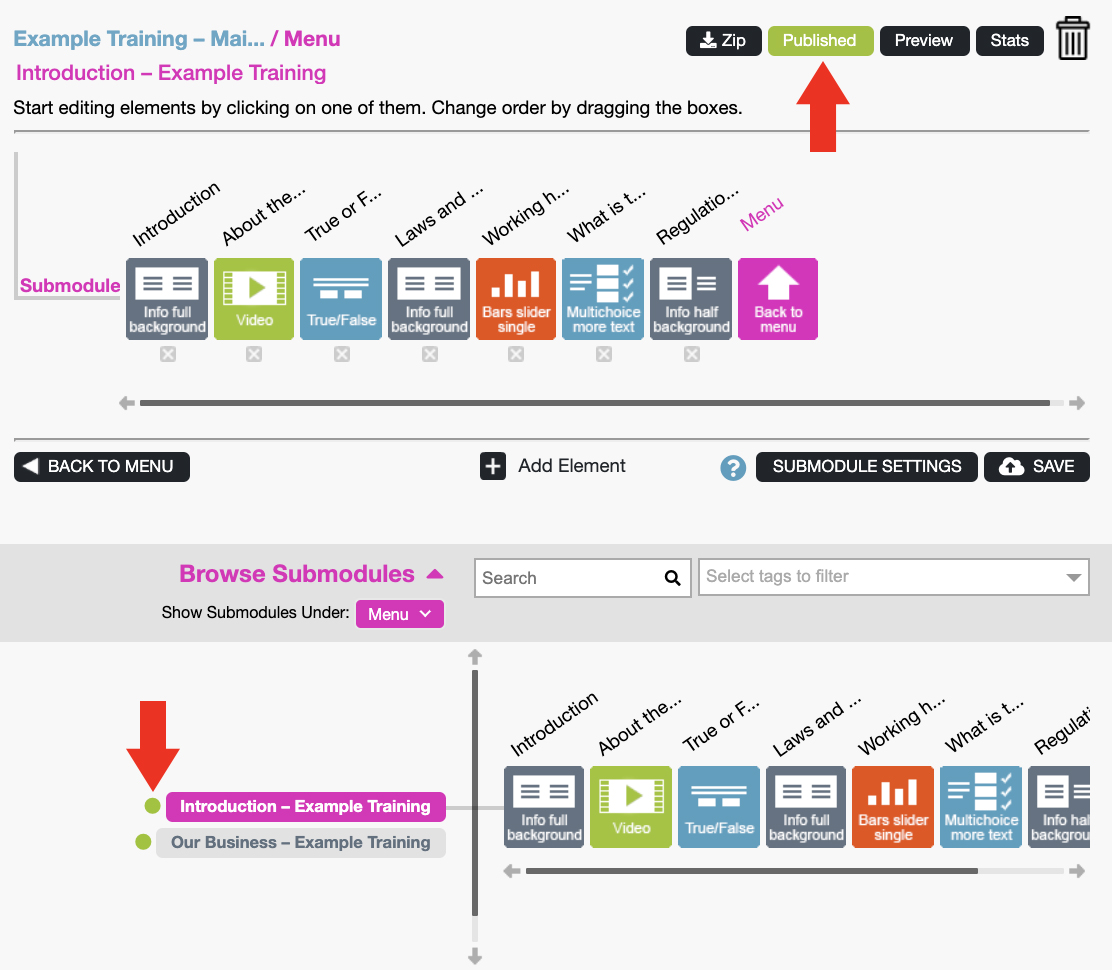
If a module is in published mode, the Submodule Settings button is hidden. You need to unpublish the module if you wish to change the module to a submodule.
If the user has created a submodule that is set as the first submodule on the list of submodules (on the top of the list), but has not published this module, it will not be displayed in Preview/Published mode. If the setting Submodules have to be completed in the order defined below is set to YES, then it is not allowed for the user to view the second submodule in the list in Preview/Published mode.
Publish the first submodule on the list to view the second submodule:
or set the Submodules have to be completed in the order defined below setting to NO by first opening the Submenu Buttons element, clicking on Edit Submodule Menu Settings from the orange gear symbol on top of Edit Element Contents view. Please note that by selecting this option, trainees can complete the submodules in the order of their choice.

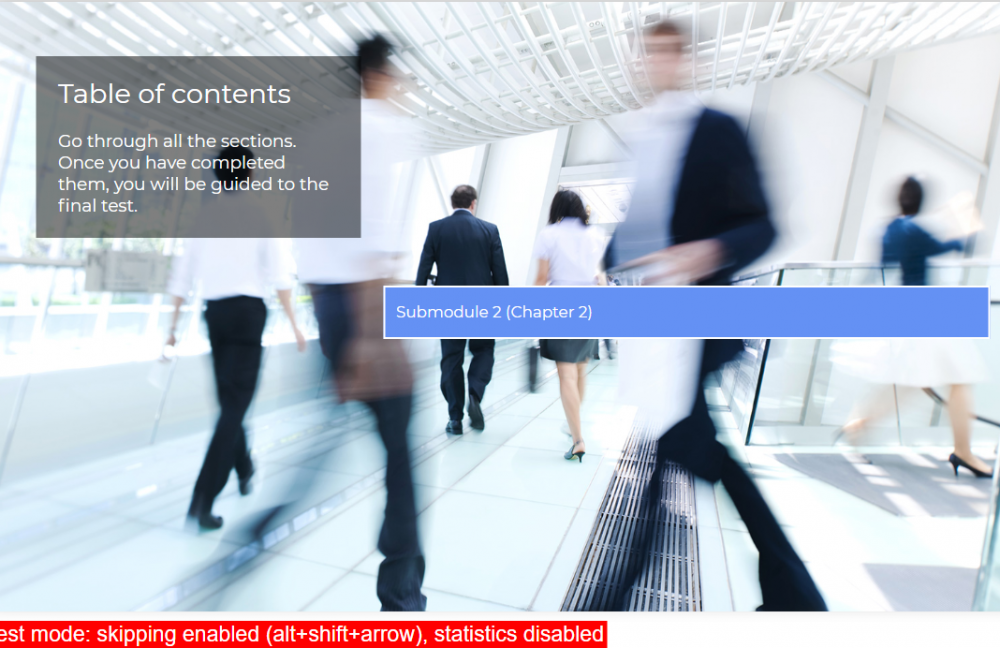
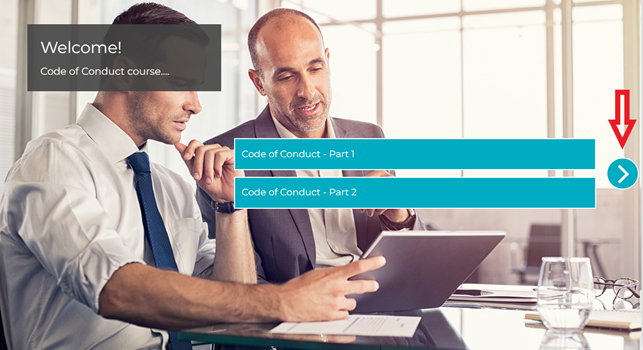
The online training created with Builder tool has a main module (in this case “Työmaaperehdytys“), which can contain several submodules (like chapters in a book), such as “Submodule 1 – Security issues“, “Submodule 2 – Contact persons” and so on.
Builder starts calculating the training percentage in the main module from 0%.
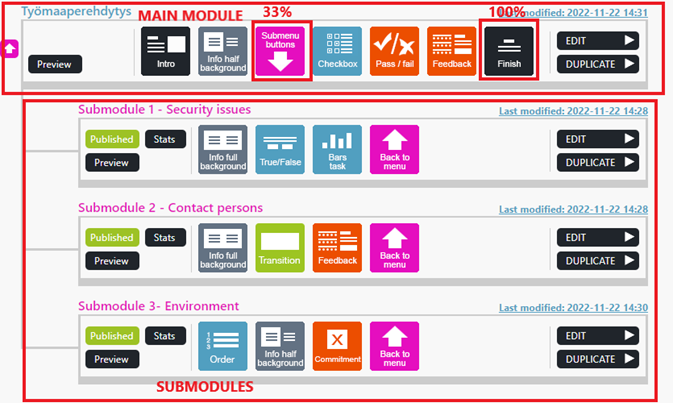
(“Työmaaperehdytys” module in Builder: main module + submodules)
When the person taking the course arrives at this page and clicks on one of the blue buttons at the right side of the window, s/he opens a submodule (e.g. “Submodule 1: Security issues“).
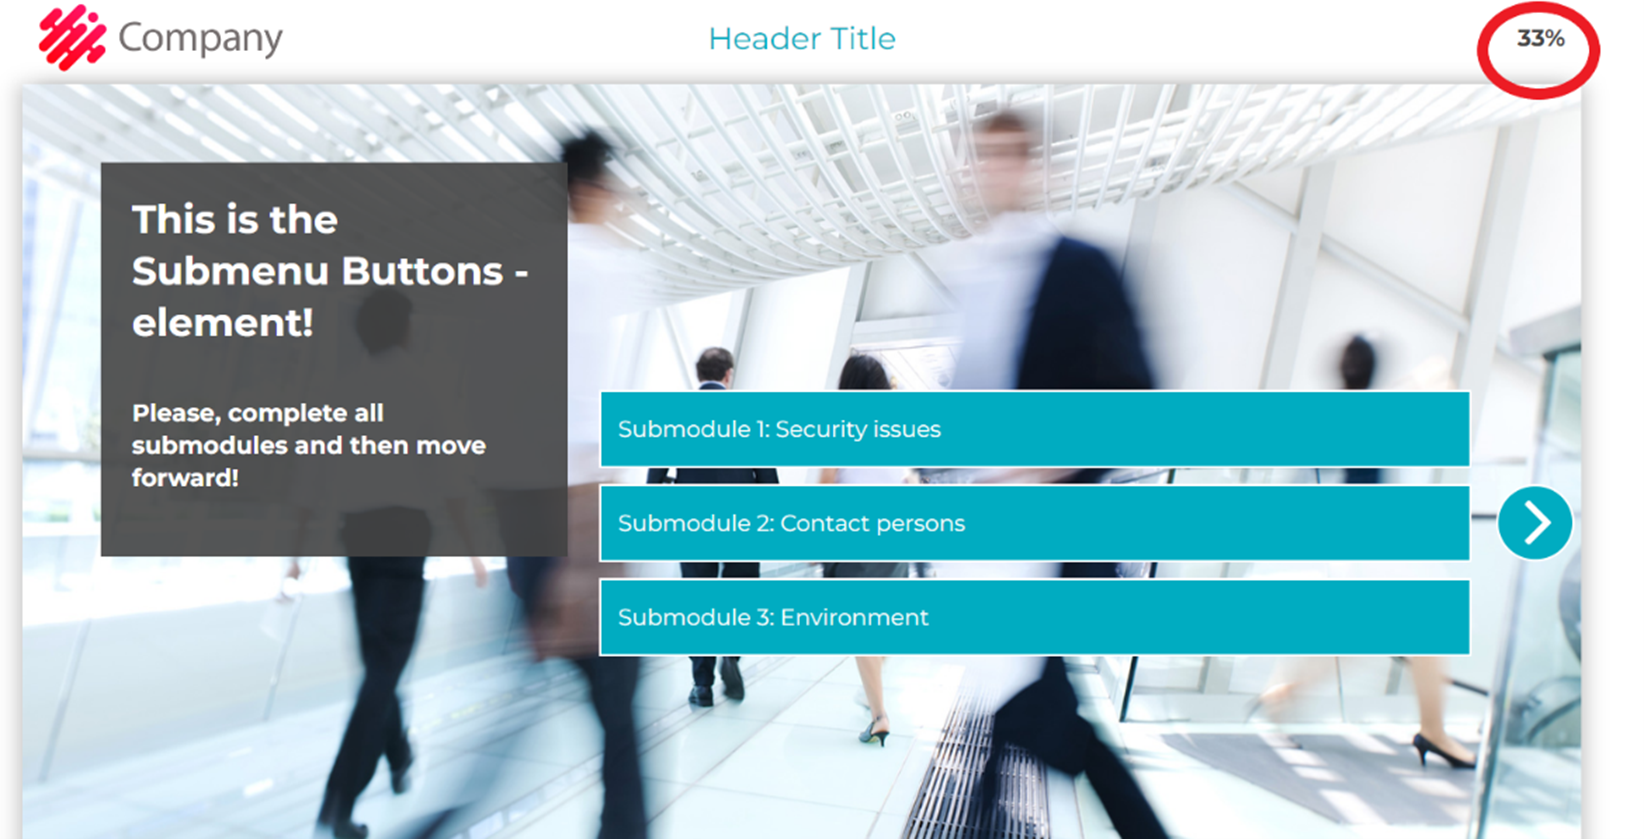
(This is the Submenu buttons element in the main module)
This is why Builder starts recalculating the percentage from “0%” since this is a new submodule.
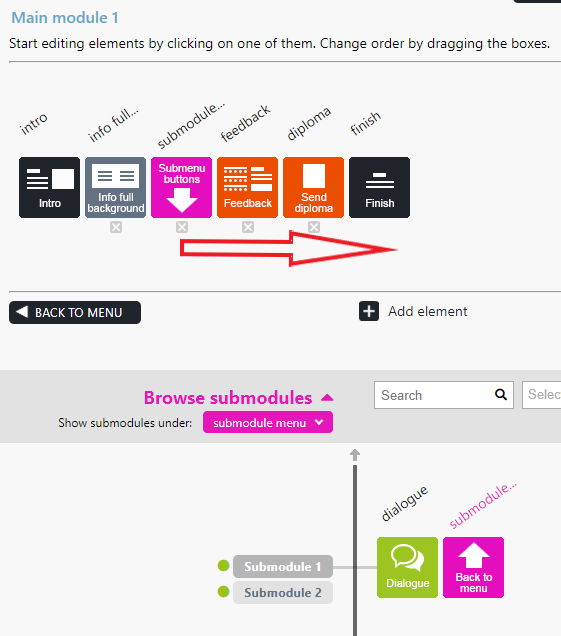
As shown in the image, the submodule does not contain a Finish element. In submodules, the last element is always “Back to menu“, but this element is never shown to the person taking the course, therefore “100%” is not visible in the submodule.
When the person taking the course has completed all mandatory submodules, s/he returns to the Submenu buttons element again. All mandatory submodules will be marked completed and the person taking the course can continue with the main module. This is why the percentage will normally continue in the main module as this is a different module than the submodules.
In other words, the main module and submodules are calculated separately.

(The Finish element is the last element of the main module)
If the module is in “Published” status, click the Published button to cancel the publication of the module, change the module name and republish the module. Note! Now that the module name has been changed, the statistics will be placed in a different table.
Remember …
- If the module link is attached to a Landing Page element, it is unnecessary to change the link.
- If you change the module name, the module link is not affected, i.e. the module link remains the same.
- You cannot have two or more modules with the same name.
- For example, if you have deleted a module called “eLearning XY” and you want to rename your module with the same name, the name of the deleted module must be changed in the database from “eLearning XY” to “eLearning XY old“. Please get in touch with Apprix in these cases.
Reminders are sent only from modules in the “Published” state.
Yes! The users’ performance records remain unchanged in the module’s statistics.
- When the Start New / Browse feature in the main module is enabled, the content of a completed submodule can be previewed.
- When previewing a module in Browse mode, a “Browse – click to skip” button appears in the bottom right corner, allowing you to skip to the next element. This button lets you preview the eLearning content without performing any of the element’s possible tasks.
- The” Browse – click to skip” button does not appear in the Finish element (last element).
- The eLearning can be continued by clicking on the Continue button at the beginning of the course.
- After completing the main module in the Submenu element, all submodules are browsable.

“Browse – click to skip” button
Check that the main module is unpublished. If it is published, unpublish it.
In the Edit Module dialogue, click on the pink Browse Submodules link. The list of submodules will appear.
- Click on the submodule you need to update. If it is in the publish state, unpublish it.
- Click the green Published button (the submodule status will now become unpublished). You can now unlink the submodule from the main module.
- Click the black Submodule Settings.
- Click ”Change to normal module”.
Now, the submodule has been changed to a normal module.
Remove the title from the Intro element (the first element of the module) of the module you just changed (just changed from submodule → normal module)
and then update the header titles for the other elements if necessary.
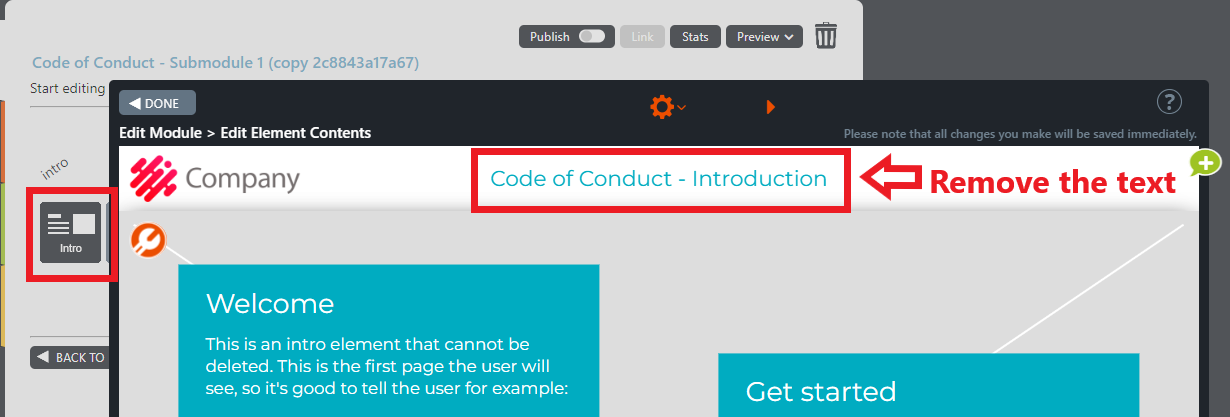
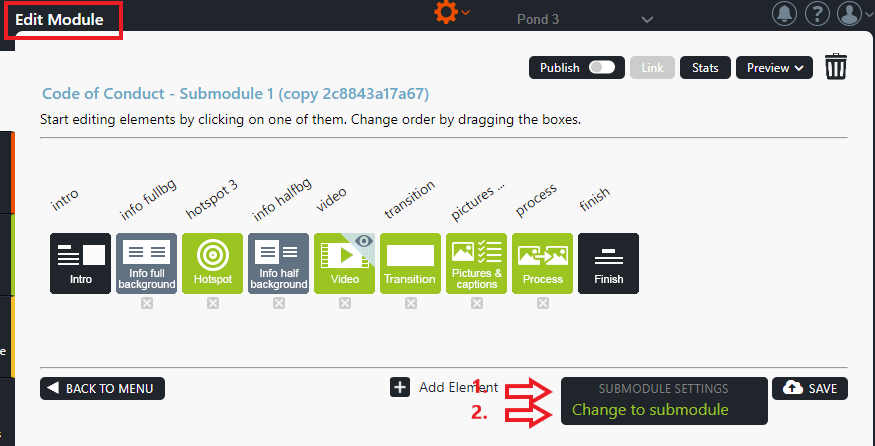
After all the titles have been updated, click the module’s Submodule settings and then Change to Submodule.
Now, the module has been changed back to a submodule.
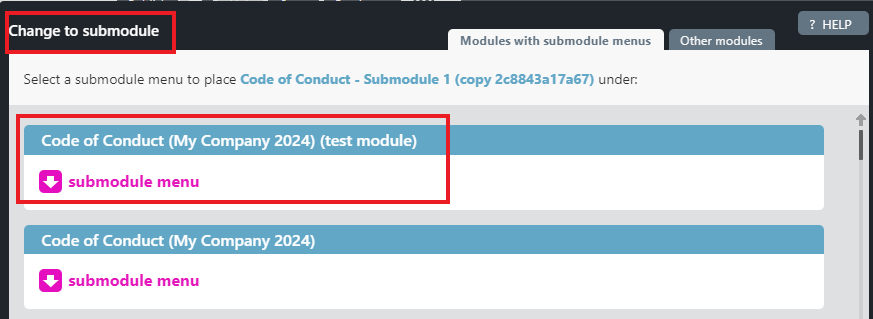
The Change to submodule dialogue opens. Find the main module to which you want to attach the submodule and click its pink Submodule Menu button.
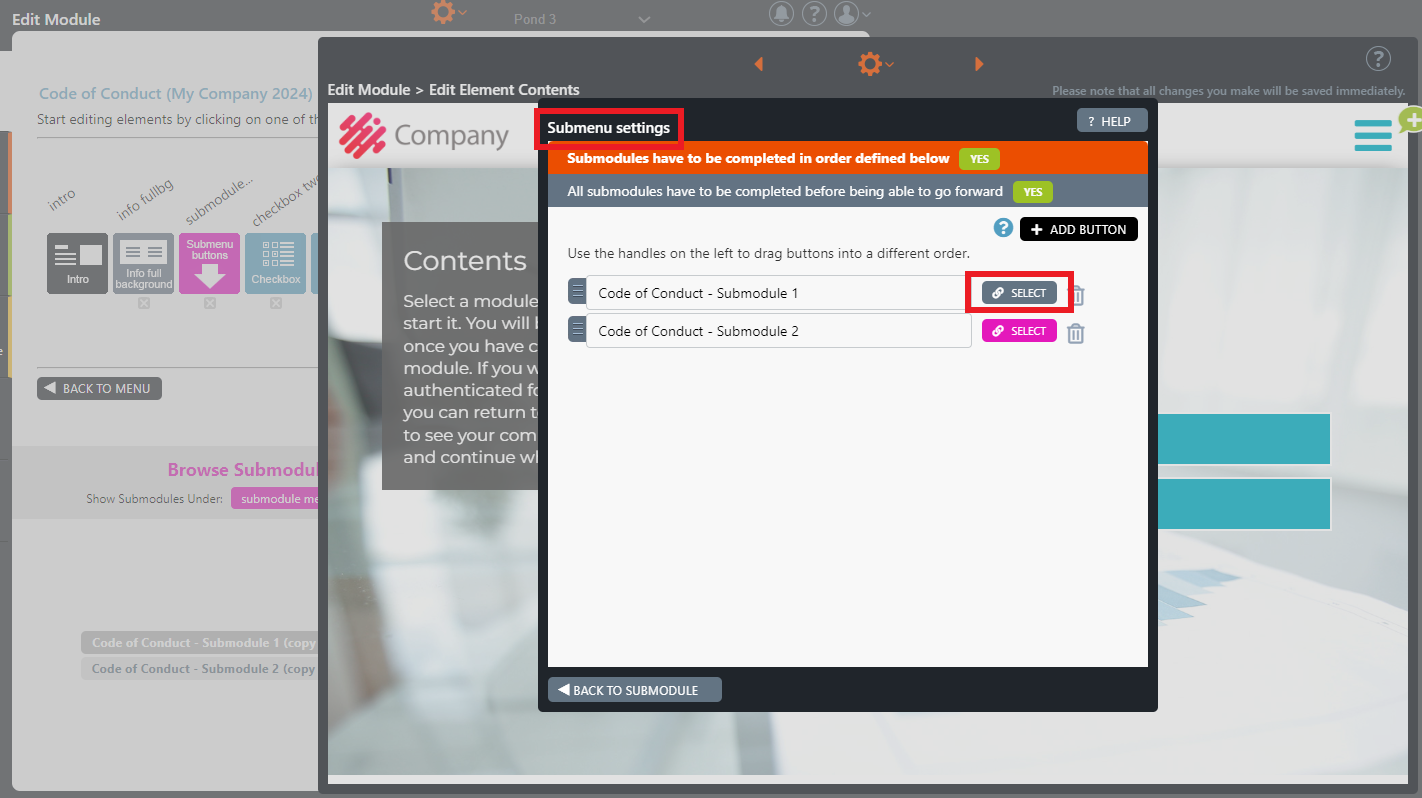
The Submenu settings dialogue is opened.
Link the submodule to the main module by clicking the grey ”Select” button. The grey button turns green when you hover your mouse over it.
Note! If the Select button is pink, another submodule is already linked to that button.
You can also update the elements’ header titles afterwards.
To republish the submodule, click on the submodule name and then on the black Publish button.
Yes, a deleted module can be restored.
If a facilitator has accidentally deleted a module and wishes to have it recovered, they should contact helpdesk@apprix.fi and request its restoration.
Yes, if there’s a need to browse the submodule content after completion, the Start new / Browse feature can be used.
This feature allows the end-user to:
- Either retake the course,
- or browse the content of an already completed online course.
At the beginning of the course, the user can select “Browse the course you’ve already completed”, which enables browsing without generating new entries in the statistics.
By clicking “Browse – click to skip”, the user can view the elements and skip the tasks.
You can find more information here:
8.6 Start New/ Browse
https://faq.apprix.fi/builder-help-en/#startnewbrowse
Elements
If the cursor is active in the text box (the cursor is blinking), and you close the element, the text will not be saved, and it will not be visible in preview mode.
To save your text, you need to click the cursor outside the active text field that you have just edited.
Please, see the example below:
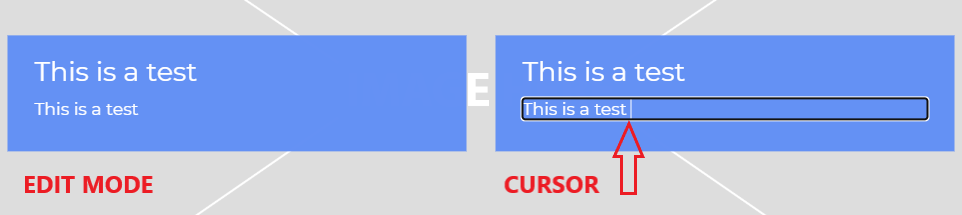

The text box in the right hand side is empty in Preview mode, since the cursor was active in the text box in Edit mode when the element was closed.
Yes!
For more information, please refer to Chapter 4.6 of the Help, titled “Copying Elements with their content.”
This feature enables the copying of elements and their content from one module to another or within the same module.
This is not technically possible. A module must always start with the Intro element and end with the Finish element; these elements cannot be moved or removed.
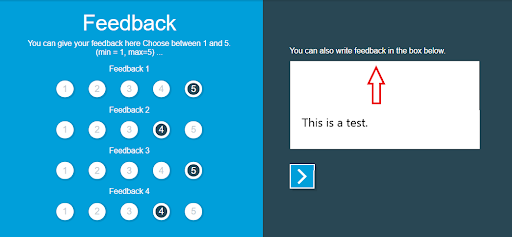
In case you need to collect feedback from the trainees, you can add one or both of the two elements at the end of the module: Feedback and Slider write text.
Once the module has been published and feedback has been collected, you can access the feedback from Stats (Statistical data) by selecting the module Stats button. The Stats pop-up window opens. Choose Big Data option. From here, you can export (in CSV, TXT, XLS and XLSX formats) the file, which contains all the feedbacks the trainees have written after taking the training.
This is quite a rare problem. It is possible that two or more users have had the same module or submodule open simultaneously in Module Edit View or some other temporary error has occurred (e.g. connection outage).
The problem is easily solved:
- Move the first element that appears to be empty to a different location and save the module.
- Then move the element back to its correct location and save the module again.
The module where the Landing page is located must have a login method in order to identify which course modules (trainings) the trainee has completed after logging in to the module containing the Landing page element. The information used for identification is an email address. The login method can be, for example, SSO, Consumer Login or a Login element.
In the Landing page element, course modules that the trainee has yet to complete are specified and the course modules that the trainee has completed are displayed. In order to identify which course modules the trainee has completed, the linked course modules must also have a login method where the identification method is an email address, similarly to the module with the Landing page element.
If the email address the trainee has provided in the module with the Landing page element matches the one provided in the linked course that the trainee has completed, the Landing page element will interpret that the trainee has completed the course. In this case, it will be displayed on the Landing page that the trainee has completed the course module.
The element titles in the Edit Module view and the titles inside the elements accessed through Edit Element Contents view are not synchronized with each other. They must be edited separately.
The Diploma element cannot be tested in Edit or Preview mode. If necessary, you can test the element by publishing and completing the element in a test module and sending yourself a diploma through this test module. If the diploma template requires visual or content changes, please contact Apprix.
If the image is not found through the link, or for some reason the link takes a while to load (e.g. a slow network connection), a blank white view will appear on the element for a while. In these cases, we recommend that you upload the image file to the image library instead of using the link.
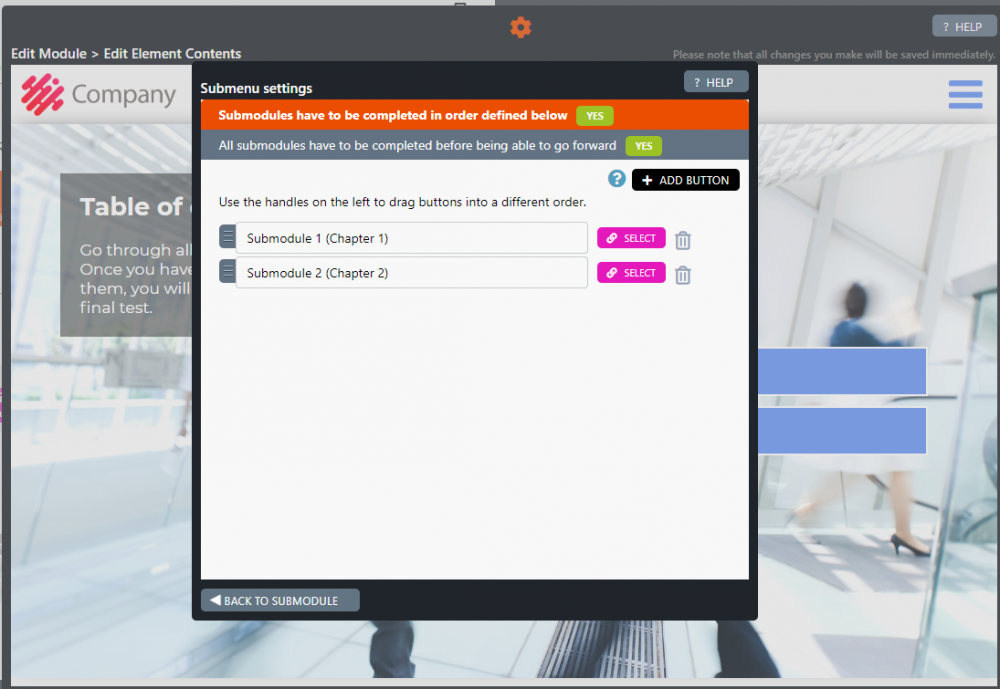
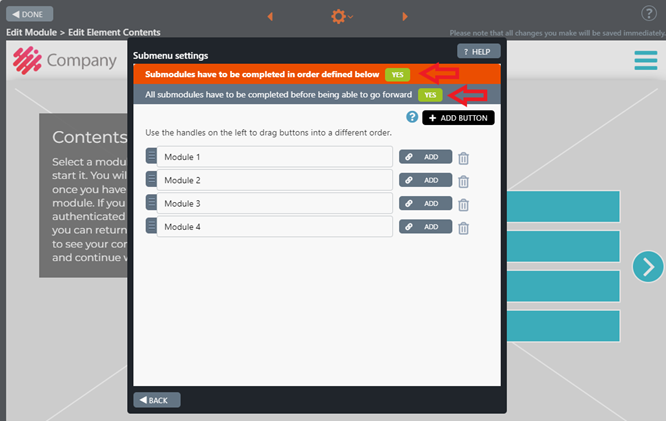
Open the “Submenu buttons” element by clicking on the element icon.
Select the “Edit submodule menu settings” option from the gear icon of the element.
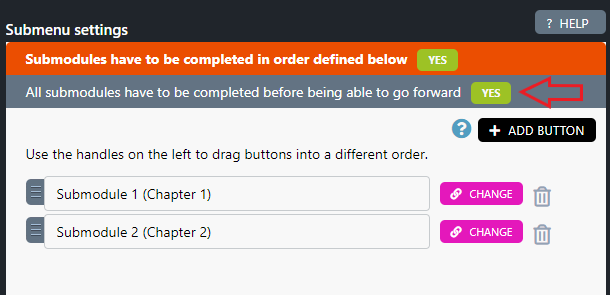
Note! If you want course participants to complete the sub-modules in the specified order AND you want all sub-modules to be completed before the course participants can move on, select these parameters:
– Submodules have to be completed in the order defined below -> YES
– All submodules have to be completed before being able to go forward -> YES
In Preview mode, the module statistics are not stored. For this reason, the Pass/Fail and Failure elements do not work in preview mode. Points are only calculated in Published mode.
Why does Builder work like this? The statistics should record the student’s performance, not the module’s testing data.
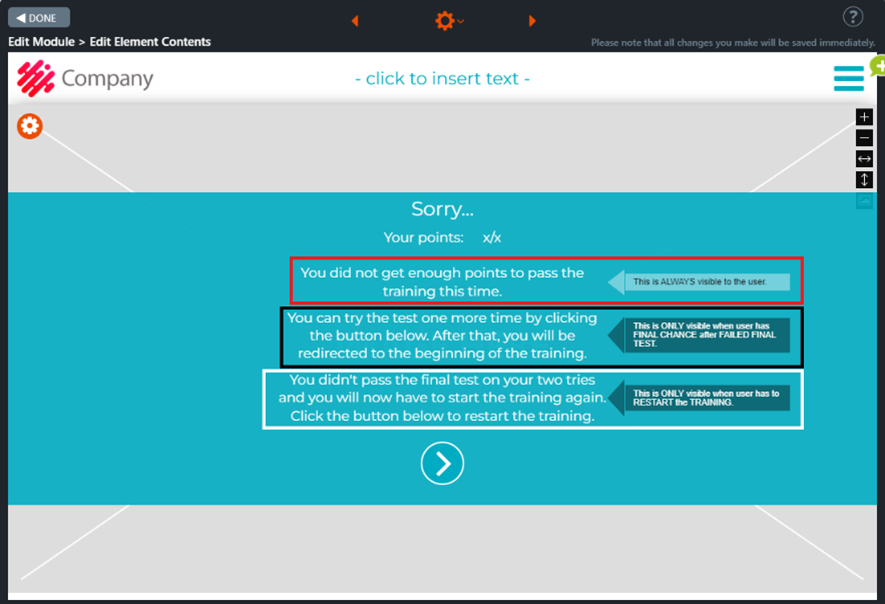
- The top text is always displayed when the user fails the training (You did not get enough points to pass the training this time).
- The middle text appears when the user has one more attempt left (You can try the test one more time by clicking the button below. After that, you will be redirected to the beginning of the training).
- The bottom text appears when the user has to start the training from the beginning (You didn’t pass the final test on your two tries and will now have to start the training again. Click the button below to restart the training).
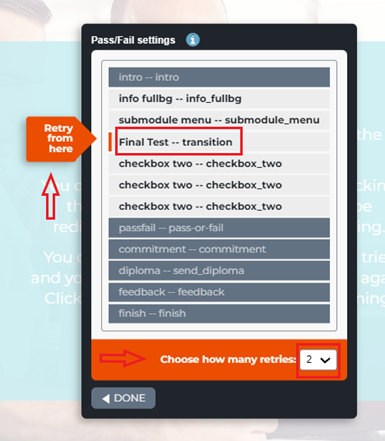
Suppose the module is duplicated or the facilitator has added or removed one or more elements from the module without checking the position of the” Retry from here” arrow in the Pass/Fail element. In that case, the retry will start from the incorrect element.
Facilitator, please remember to check the position of the” Retry from here” arrow in the Pass/Fail element:
- in a duplicated module
- if you add or remove elements included in the final test.
The course currently uses the Pass/Fail element.
With this setting, the test score is only shown to those who do not pass the final test.
Course participants have requested that the score be visible even when the test is passed.
✅ Solution: Pass/Fail Always element
Pass/Fail Always is an improved version of the original element.
With this option, even course participants who pass the final test will see their score.
Yes! Just remember to select one sentence at a time if you want to change the colour of the bullets or the numbers.

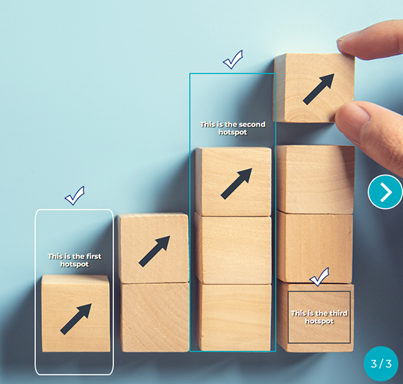
Yes, it is possible with HotSpot version 3. With this version, you can choose the option “Hotspot title visible” and the colour of each hotspot item.
Builder offers a Document Embed element, which allows documents to be displayed directly within the course content. The purpose of this element is to enable participants to read embedded training materials as part of the learning experience, without needing to navigate away from the course.
For more information, please check this link:
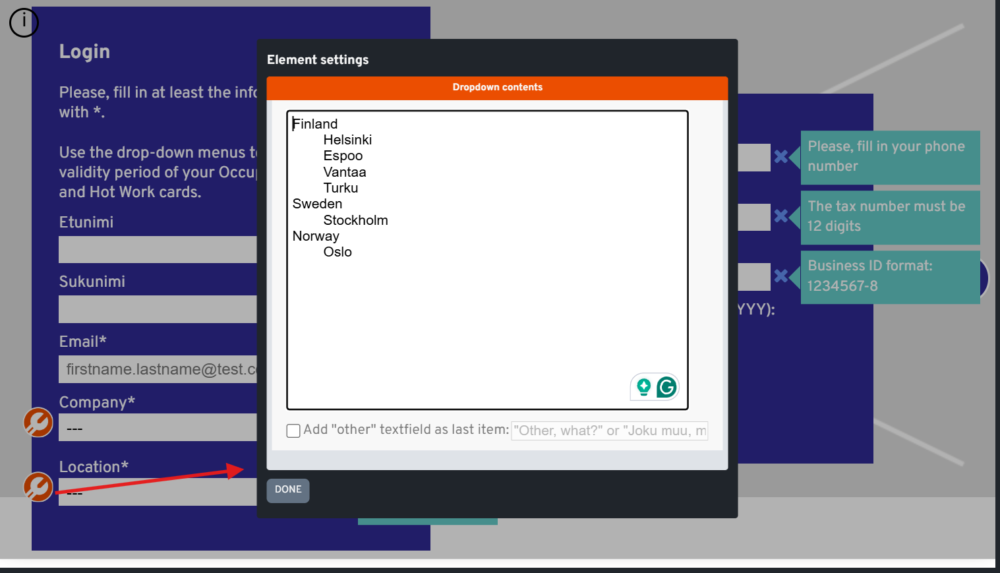
In the Login element, you can add a new location by clicking the tool icon next to the location field. This will open a dropdown contents window where you can add the list of locations.
Statistics
The trainee’s registration process begins registering as soon as they start the online course (module). In order for the trainee to receive the performance mark, they must take the course from the start to the “Finish” element. Then the value in the “Finished” field in the statistics will be “1”.
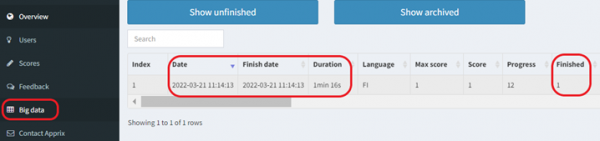
Sometimes it may happen that trainees do not arrive at the end of the course (Finish element) and their performance is not “finished” and it is incomplete in the logs and in the statistic. In this case, the “Finished” field will have the value “0”. If the trainee wants to complete the course, they must log back into the course again and complete it to the Finish element.
“Score” and “Max Score” indicates performance points/max possible points in a module.
Note! The score will be reset if the trainee then returns to a module that has been completed and starts the module again.
If the module does not have a Login element and the module is not completed in the Learning Management System (LMS), the date of completion, scores, progress and finished value are stored in the statistics, but without any personal information, such as first name or last name. There is no means to identify the trainee from module statistics.
The only way is to add those trainings to a LMS if you do not want a separate Login element in the module. In the LMS, the trainee is automatically logged in and the trainee’s student ID is recorded in the statistics, so that the performance of the trainee can be identified.
“FI” is the default value. Builder does not currently have the functionality to tell you what is the exact language of the training.
Incomplete sessions:
If Builder detects on login that a returning trainee has not yet completed the course, they will be redirected to continue the earlier session from the point where they left off, and the data entered up to that point will be retained. However, if a trainee navigates backwards in the course to the point where the data to be included in the statistics needs to be re-entered, the trainee will need to re-enter the data from that point onwards.
If a trainee logs in from the beginning of the course and then starts to work through the course, they will start a new attempt with an empty statistics record.
Failed attempts:
If a trainee does not pass the final exam in the specified number of attempts, they will be taken back to the beginning of the course. The next time they log in, they will start a new session without the data from the previous runs (sessions). However, the previous failed attempt will not be removed from the statistics.
Check the content of the field in the element and then compare it to the field name in the statistics.
Note! If the value of the data in the field is different from “1”, it means that the user has failed in one attempt to complete the exercise.
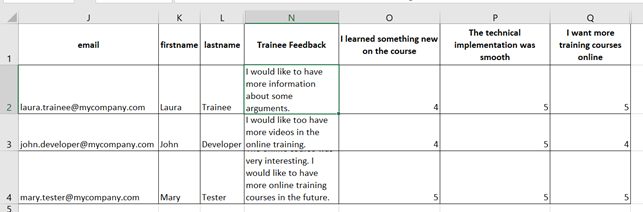
If the module contains an element that collects feedback data from trainees and you want to review their feedback, please open the module’s Big Data tab from the statistics.
You can download the data stored in the feedback columns from the Export button in the Big Data view.

Here is an example of an Excel report that has been modified (extra columns are hidden) to include only feedback and trainee data.
The time spent is based on the time the training page is displayed in the browser window. If you switch to another tab or hide the training page, the countdown will stop. The countdown will resume when you view the training page again.
Statistics columns:
- Duration: The time spent on the module
- Total Duration: The time spent on the main module and sub-modules, ie the time spent on total training
You can view the feedback provided by the trainees from the Feedback view of the Statistics if the module contains the Feedback element.
In this view, you can see the feedback of those trainees that have completed the training.
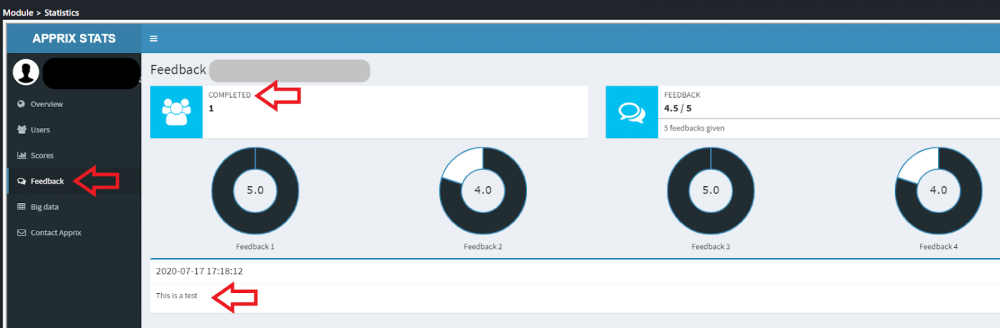
The written feedbacks in the Feedback view are the free-form feedback that trainees have entered in the module’s Feedback text box at the right side of the Feedback element.
If you want to review all the feedback given in the Feedback element, you need to open the Big Data view from the Statistics. Here you can export the data you want to analyze using the Export CSV / Excel buttons.

An Apprix customer has a sub-contractor and would like to train the subcontractor’s staff using the training created by the Apprix customer using Builder. The customer asks if they can provide the subcontractor with training statistics in an Excel file.
In order for the data to be collected in the statistics, the customer solution implemented in Builder for training must be able to communicate with the LMS platform. The most common way to communicate with an LMS platform is to implement it according to the SCORM standard. By default, customer solutions implemented in Builder do not store personal information provided by the LMS in statistics. Please contact your Apprix account manager to discuss this.
Training on the Builder platform can be used on the LMS platform to train subcontractors, regardless of who owns the LMS platform. If required, the data collected from the training can later be retrieved from Builder into an Excel file and shared with anyone who needs it.
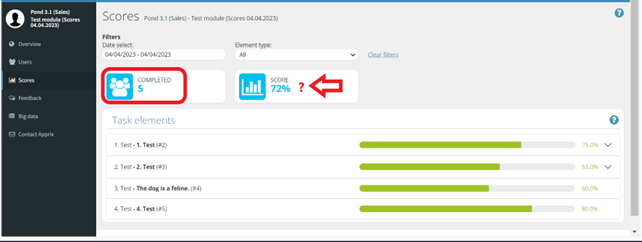
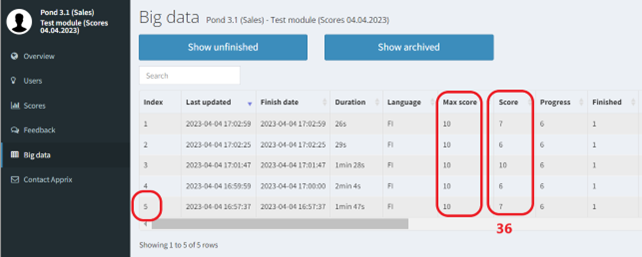
- The number of participants who completed the course (5)
- The average score received by course participants in percentage (36:5) = 72%.
Performances are not removed. Changing the structure of the module will cause the following in the statistics:
- The “Progress” value will be displayed with the old performances. New performances will then have the “Progress” according to the new structure of the module. For example, if a module previously had 10 elements, and you remove one element, the progress = 10 will still be displayed for old completions, but for new ones, it will be 9. The same applies to the points collected from the module if you change them.
- Deletion of a task element (e.g. checkbox-two): deleted task elements are archived and are not shown in the statistics by default. However, they can be displayed by clicking on the “Show archived” button.
- Deletion of a content element (e.g. info-full bg): no effect on the stats except that new executions have progress different from old ones.